JVC KW-M560BT Instruction Manual America - Page 48
Installing the unit, Supplied accessories for, installation, Installation procedure, Non-Japanese cars
 |
View all JVC KW-M560BT manuals
Add to My Manuals
Save this manual to your list of manuals |
Page 48 highlights
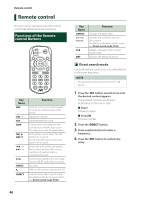
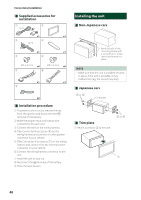
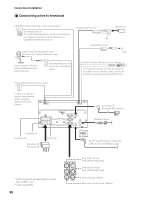
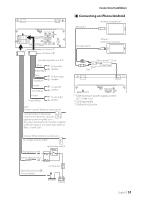
Connection/Installation ÑÑSupplied accessories for installation 1 2 (3 m) x1 x1 3 4 (2 m) x1 x1 5 6 (M5 × 6 mm) x6 (M5 × 8 mm) x6 7 8 x1 x1 9 x2 ÑÑInstallation procedure 1) To prevent a short circuit, remove the key from the ignition and disconnect the ¤ terminal of the battery. 2) Make the proper input and output wire connections for each unit. 3) Connect the wire on the wiring harness. 4) Take Connector B (accessory 8) on the wiring harness and connect it to the speaker connector in your vehicle. 5) Take Connector A (accessory 7) on the wiring harness and connect it to the external power connector on your vehicle. 6) Connect the wiring harness connector to the unit. 7) Install the unit in your car. 8) Reconnect the ¤ terminal of the battery. 9) Press the reset button. Installing the unit ÑÑNon-Japanese cars Bend the tabs of the mounting sleeve with a screwdriver or similar utensil and attach it in place. NOTE • Make sure that the unit is installed securely in place. If the unit is unstable, it may malfunction (eg, the sound may skip). ÑÑJapanese cars 5 or 6 Car Bracket ÑÑTrim plate 1) Attach accessory 2 to the unit. 5 or 6 2 48
-
 1
1 -
2
-
3
-
4
-
5
-
6
-
7
-
8
-
9
-
10
-
11
-
12
-
13
-
14
-
15
-
16
-
17
-
18
-
19
-
20
-
21
-
22
-
23
-
24
-
25
-
26
-
27
-
28
-
29
-
30
-
31
-
32
-
33
-
34
-
35
-
36
-
37
-
38
-
39
-
40
-
41
-
42
-
 43
43 -
 44
44 -
 45
45 -
 46
46 -
 47
47 -
 48
48 -
 49
49 -
 50
50 -
 51
51 -
 52
52 -
 53
53 -
54
-
55
-
56
-
57
-
58
-
59
-
60
-
61
-
62
 |
 |
