Kenwood C-V751 User Manual - Page 28
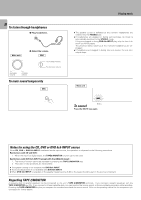
To listen through headphones, To mute sound temporarily, To cancel, Notes for using the CD
 |
View all Kenwood C-V751 manuals
Add to My Manuals
Save this manual to your list of manuals |
Page 28 highlights
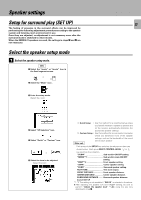
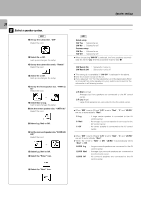
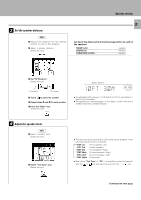
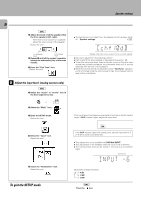
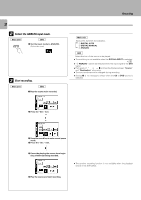
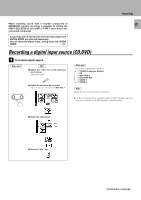
28 To listen through headphones 1 Plug headphones. PHONES Main unit VOLUME CONTROL 2 Adjust the volume. GRC UP UME To increase volume VOL DOWN To decrease volume UP To increase volume DOWN To decrease volume To mute sound temporarily GRC MUTE SouPndlaaydinjugsmtmuesinct ÷ The speaker sound is defeated at the moment headphones are inserted into the PHONES jack. ÷ If headphones are plugged in during surround play, its mode is automatically switched to the STEREO mode. If they are plugged in during DVD 6ch INPUT play, only the front L ch and R ch will be played. The previous status resumes at the moment headphones are unplugged. ÷ If headphones are plugged in during test tone output, the test tone output stops. Main unit AUTO STEREO MEMO.TUNED F M RDS EON TP A M PTY TA NEWS MW MUTE CLIP LW Blinks To cancel Press the MUTE key again. Notes for using the CD, DVD or DVD 6ch INPUT source When CD, DVD or DVD 6ch INPUT is selected as the input source, the operation is subjected to the following restrictions. Restrictions with CD and DVD: 1. When the input is a digital signal, the TAPE2/MONITOR function cannot be used. Restrictions with DVD 6ch INPUT (except with the ANALOG input) : 1. The monitor function cannot be activated by pressing the TAPE 2/MONITOR key. 2. The Listen mode operations are not available. ÷ The speaker setting is not available with DVD 6ch INPUT. ÷ The sound adjustment is not available with DVD 6ch INPUT. ÷ When DVD 6ch INPUT is selected, all the speaker levels become 0 dB so the levels should be set on the source component. Regarding TAPE 2/MONITOR A cassette deck or graphic equalizer can be connected to this unit's TAPE 2/MONITOR terminals. If you connect a graphic equalizer, turn the TAPE 2/MONITOR key ON. If you connect a 3-head cassette deck, you can monitor the source sound, or the sound being recorded, while recording. Pressing the TAPE 2/MONITOR key lets you compare the recorded sound and the source sound. Refer to the operating manual for the component you connected for further details.
-
 1
1 -
2
-
3
-
4
-
5
-
6
-
7
-
8
-
9
-
10
-
11
-
12
-
13
-
14
-
15
-
16
-
17
-
18
-
19
-
20
-
21
-
22
-
 23
23 -
 24
24 -
 25
25 -
 26
26 -
 27
27 -
 28
28 -
 29
29 -
 30
30 -
 31
31 -
 32
32 -
 33
33 -
34
-
35
-
36
-
37
-
38
-
39
-
40
-
41
-
42
-
43
-
44
-
45
-
46
-
47
-
48
-
49
-
50
-
51
-
52
-
53
-
54
-
55
-
56
-
57
-
58
-
59
-
60
-
61
-
62
-
63
-
64
 |
 |
