Kenwood DVR-7000 User Manual - Page 17
Operation of remote control unit
 |
View all Kenwood DVR-7000 manuals
Add to My Manuals
Save this manual to your list of manuals |
Page 17 highlights
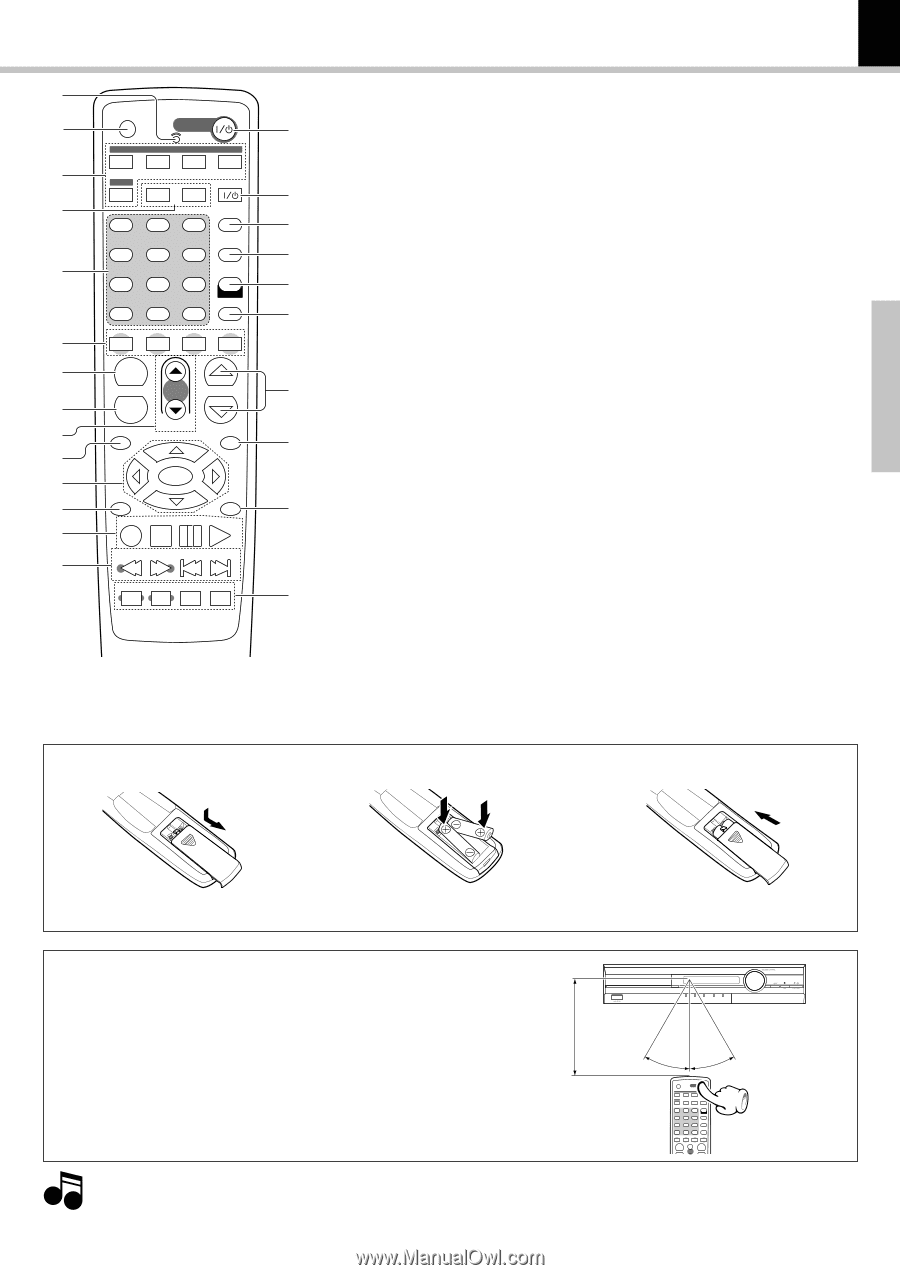
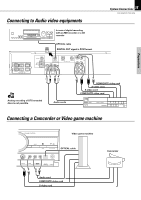
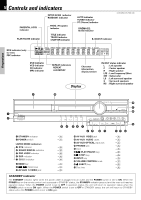
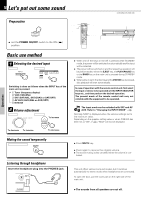
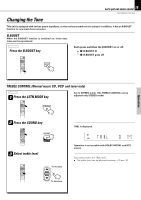
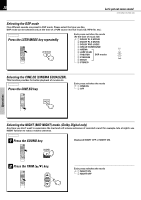
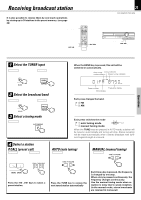
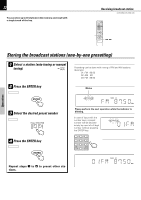
Preparations M Operation of remote control unit 17 1 2 3 4 5 6 7 8 9 0 ! @ # $ MUTE POWER DVD CD AV AUX INPUT SELECTOR RADIO VCR SAT BAND DEVICE TV CABLE TV INPUT 1 2 3 LSTN MODE 4 5 6 SOUND 7 8 9 SETUP +10 +100 INPUT MODE CLEAR 0 P.MODE RANDOM F C R SW + REPEAT CH. A-B - TOP MENU GUIDE TRIM ULTI C ON VOLUME MENU PTY T. O ENTER RETURN EXIT S.TITLE AUTO/MONO N SCREEN RDS SELECT TUNE / TV. VOLUME P.CALL / THUM / PAGE JUMP SLOW STEP B.BOOST CINE.EQ % ^ & * ( ) ¡ ™ £ ¢ Model : RC-R0722 (for U.K.) RC-R0721 (for other countries) Infrared ray system Loading batteries 1 Remove the cover. DVR-505/DVR-7000 (EN) The keys on the remote control unit with the same names as on the main unit have the same function as the keys on the main unit. 1 LED indicator E 2 MUTE key * 3 INPUT SELECTOR keys * DVD CD key RADIO/BAND key VCR key SAT (Satellite) key AV AUX key 4 Device keys E TV key CABLE key 5 Numeric keys (0 - 9, +10,+100) §P CLEAR key ¶ P.MODE key › 6 Speaker select keys W F (Front) key C (Center) key R (Rear/Surround) key SW (Subwoofer) key 7 CH.(Channel) + key P /REPEAT key ¤ 8 CH.(Channel) - key /A-B Repeat key P ¤ 9 TRIM / MULTI CONT. Up (5), Down (∞) keys Q 0 TOP MENU key ‡ /GUIDE key P ! Cursor Up (5), Down (∞), Left (2) and Right (3) keys › ENTER key • @ RETURN key / EXIT key w P # q (record) /S.TITLE (SUB TITLE) key ª 7 (stop) / AUTO/MONO key ¡∞ 8 (pause) key 3 (play) key ∞ ∞ $ 1 / ¡ key (Search keys) TUNE/ keys § /TV. VOLUME keys P 4 key/¢ key (Skip keys) P.CALL keys § /THUM/PAGE keys P % POWER key & ^ DEVICE Power key & TV INPUT key P P * LSTN MODE (LISTEN MODE) key )o ( SOUND / SETUP key (p ) INPUT MODE / RANDOM key ‹ ¡ VOLUME keys * ™ PTY (for U.K. only) / MENU key ¢w ™ RDS (for U.K. only) / ON SCREEN key £¶ ¢ SLOW / JUMP key STEP key § § B.BOOST key ( CINE.EQ key ) * Depending on the area, the AUTO/MONO key is marked as MONO. 2 Insert batteries. 3 Close the cover. ÷ Insert two LR03 ("AAA"-size) batteries following the polarity indications. Operation Insert the power plug into a power outlet, press the POWER switch of the main unit to ON, then press the POWER key on the remote control. Remote sensor 6m ÷ When pressing more than one remote control keys successively, press the keys securely by leaving an interval of 1 second or more between pressing of keys. Operating range (approx.) 30º 30º Notes 1. The provided batteries are intended for use in operation checking, and their service life may be short. 2. When the remote controllable distance becomes short, replace both of the batteries with new ones. 3. If direct sunlight or the light of a high- frequency fluorescent lamp (inverter type, etc.) is incident to the remote sensor, malfunction may occur. In such a case, change the installation position to avoid malfunction.
-
 1
1 -
2
-
3
-
4
-
5
-
6
-
7
-
8
-
9
-
10
-
11
-
 12
12 -
 13
13 -
 14
14 -
 15
15 -
 16
16 -
 17
17 -
 18
18 -
 19
19 -
 20
20 -
 21
21 -
 22
22 -
23
-
24
-
25
-
26
-
27
-
28
-
29
-
30
-
31
-
32
-
33
-
34
-
35
-
36
-
37
-
38
-
39
-
40
-
41
-
42
-
43
-
44
-
45
-
46
-
47
-
48
-
49
-
50
-
51
-
52
-
53
-
54
-
55
-
56
-
57
-
58
-
59
-
60
-
61
-
62
-
63
-
64
-
65
-
66
-
67
-
68
 |
 |