Kenwood DVR-7000 User Manual - Page 4
Accessories, CHANNEL SPACE setting - manual
 |
View all Kenwood DVR-7000 manuals
Add to My Manuals
Save this manual to your list of manuals |
Page 4 highlights
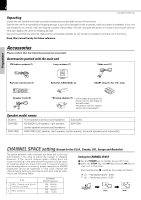
4 DVR-505/DVR-7000 (EN) Unpacking Unpack the unit carefully and make sure that all accessories are put aside so they will not be lost. Examine the unit for any possibility of shipping damage. If your unit is damaged or fails to operate, notify your dealer immediately. If your unit was shipped to you directly, notify the shipping company without delay. Only the consignee (the person or company receiving the unit) can file a claim against the carrier for shipping damage. We recommend that you retain the original carton and packing materials for use should you transport or ship the unit in the future. Keep this manual handy for future reference. Accessories Please confirm that the following accessories are present. Accessories packed with the main unit FM indoor antenna (1) Loop antenna (1) Video cord (1) Preparations Remote control unit (1) Batteries (LR03/AAA) (2) SCART plug (1) (for U.K. only) Speaker cords (6) *AC plug adaptor (1) * Use to adapt the plug on the power cord to the shape of the wall outlet. (Accessory only for regions where use is necessary.) Speaker model names System Front speakers and surround speakers Subwoofer DVR-505 KS-305DV (Left speaker, right speaker, SW-15DV center speaker and surround speakers) DVR-7000 KSW-7000 (Left speaker, right speaker, center speaker, surround speakers and subwoofer) CHANNEL SPACE setting (Except for the U.S.A., Canada, U.K., Europe and Australia) The space between radio channels has been set to the one that prevails in the area to which the system is shipped. However, if the current channel space setting does not match the setting in the area where the system is to be used, for instance when you move from area 1 or area 2 shown in the following table or vice versa, proper reception of AM/FM broadcasts cannot be expected. In this case, change the channel space setting in accordance with your area by referring to the following table. Area 1 USA, Canada and South American countries 2 Other countries CHANNEL SPACE frequency FM : 100 kHz AM : 10 kHz FM : 50 kHz AM : 9 kHz Setting the CHANNEL SPACE 1 Set the POWER key to standby (power off) mode. 2 press the STOP key, the ¢ key and the 4 key on main unit in this order. Each operate step 2, switches the modes as follows. 1 "FM100/AM10 kHz" STEP 2 "FM 50 /AM 9 kHz" STEP
-
 1
1 -
 2
2 -
 3
3 -
 4
4 -
 5
5 -
 6
6 -
 7
7 -
 8
8 -
 9
9 -
 10
10 -
11
-
12
-
13
-
14
-
15
-
16
-
17
-
18
-
19
-
20
-
21
-
22
-
23
-
24
-
25
-
26
-
27
-
28
-
29
-
30
-
31
-
32
-
33
-
34
-
35
-
36
-
37
-
38
-
39
-
40
-
41
-
42
-
43
-
44
-
45
-
46
-
47
-
48
-
49
-
50
-
51
-
52
-
53
-
54
-
55
-
56
-
57
-
58
-
59
-
60
-
61
-
62
-
63
-
64
-
65
-
66
-
67
-
68
 |
 |