Kenwood TS-590S User Manual - Page 83
Problem, Probable Cause, Corrective Action, FINE F.LOCK], HI/SHIFT, LO/WIDTH, NR LEV], BC A.NOTCH],
 |
View all Kenwood TS-590S manuals
Add to My Manuals
Save this manual to your list of manuals |
Page 83 highlights
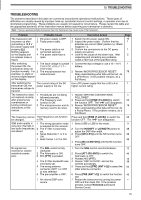
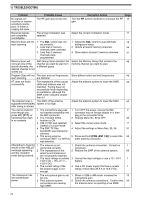
15 TROUBLESHOOTING TROUBLESHOOTING The problems described in this table are commonly encountered operational malfunctions. These types of difficulties are usually caused by improper hook-up, accidental incorrect control settings, or operator error due to incomplete programming. These problems are usually not caused by circuit failure. Please review this table and the appropriate section(s) of this instruction manual before assuming your transceiver is defective. Note: Placing a powered portable transceiver near this transceiver may cause noise in the transceiver. Problem Probable Cause The transceiver will not power up after connecting a 13.8 V DC power supply and pressing [ ]. Nothing appears on the display and no receiver noise is heard. 1 DC power supply is OFF. 2 Faulty power cable. 3 The power cable is not connected securely. 4 The power cable fuse is open. After switching 1 The input voltage is outside the power ON, the 13.8 V DC ±15% (11.7 ~ transceiver does not 15.8 V DC) function normally. For 2 The microprocessor has example, no digits or malfunctioned. incorrect digits appear on the display. After switching the transceiver ON, the transceiver refuses to transmit. The current rating of the DC power supply is too low. The transceiver does not respond correctly after pressing key combinations or turning controls per instructions in this manual. 1 Procedures are not being followed precisely. 2 The Frequency Lock function is ON. 3 The microprocessor and its memory need to be reset. The frequency cannot be changed. SSB audio quality is very poor; the high or low audio frequencies are absent. The Frequency Lock function is ON. 1 The wrong operation mode is selected for the receiver. 2 The IF filter is incorrectly set. 3 Noise Reduction 1 or 2 is ON. 4 Beat Cancel 1 or 2 is ON. No signals are received or receive sensitivity seems poor. 1 The SQL control is fully clockwise. 2 The Attenuator is ON. 3 MIC [PTT] is pressed. 4 The IF filter bandwidth was incorrectly set. 5 The wrong antenna connector (ANT 1 or ANT 2) was selected. 6 The pre-amplifier is OFF. 7 An internal DSP error occurs. Corrective Action Page 1 Switch the DC power supply ON. 10 2 Inspect the power cable. Confirm that the 1 polarities are correct (Red: positive (+); Black; negative (-)). 3 Confirm the connections to the DC power 1 supply are secure. 4 Look for the cause of the blown fuse. After 2 inspecting and correcting any problems, install a new fuse of the specified rating. 1 Correct the input voltage or use a 12 ~ 16 V 1 battery. 2 Review "MICROPROCESSOR RESET". 78 After understanding what data will be lost, do a VFO Reset. If the problem remains, do a Full Reset. Use a DC power supply that has a 20.5 A or 1 higher current rating 1 Review "WRITING CONVENTIONS ii FOLLOWED". 2 Press and hold [FINE (F.LOCK)] to switch 53 the function OFF. The " " icon disappears. 3 Review "MICROPROCESSOR RESET". 78 After understanding what data will be lost, do a Partial Reset. If the problem remains, do a Full Reset. Press and hold [FINE (F.LOCK)] to switch the 53 function OFF. The " " icon disappears. 1 Select USB or LSB for the mode. 11 2 Turn the HI/SHIFT or LO/WIDTH control to 38 adjust the DSP filter width. 3 Press [NR (LEV)] until the NR function turns 39 OFF. 39 4 Press [BC (A.NOTCH)] until the BC function turns OFF. 1 Turn the SQL control counterclockwise. 12 2 Press [ATT (RX ANT)] to switch the 40 Attenuator is OFF. 3 Release MIC [PTT]. 13 4 Review "DSP FILTERS", and set the 38 controls accordingly. 5 Press and hold [PRE (ANT 1/2)] to select the 50 other antenna connector. 6 Press [PRE (ANT 1/2)] to switch the function 40 ON. 7 Restart the transceiver by turning the power - OFF and then back ON. If the problem persists, consult Kenwood authorized Service Center. 75
-
 1
1 -
2
-
3
-
4
-
5
-
6
-
7
-
8
-
9
-
10
-
11
-
12
-
13
-
14
-
15
-
16
-
17
-
18
-
19
-
20
-
21
-
22
-
23
-
24
-
25
-
26
-
27
-
28
-
29
-
30
-
31
-
32
-
33
-
34
-
35
-
36
-
37
-
38
-
39
-
40
-
41
-
42
-
43
-
44
-
45
-
46
-
47
-
48
-
49
-
50
-
51
-
52
-
53
-
54
-
55
-
56
-
57
-
58
-
59
-
60
-
61
-
62
-
63
-
64
-
65
-
66
-
67
-
68
-
69
-
70
-
71
-
72
-
73
-
74
-
75
-
76
-
77
-
 78
78 -
 79
79 -
 80
80 -
 81
81 -
 82
82 -
 83
83 -
 84
84 -
 85
85 -
 86
86 -
 87
87 -
 88
88 -
89
-
90
-
91
-
92
 |
 |
