KitchenAid KDRP707RSS Use and Care Guide - Page 11
Electronic Oven Control
 |
View all KitchenAid KDRP707RSS manuals
Add to My Manuals
Save this manual to your list of manuals |
Page 11 highlights
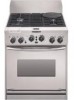
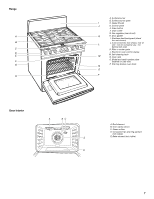
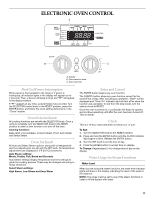
ELECTRONIC OVEN CONTROL A B C A. Display B. Oven selector knob C. Oven set knob First Use/Power Interruption When power is first supplied to the range or if power is interrupted, all indicator lights in the display will appear on for 2 seconds. Then, a buzzer will beep 3 times and "PF" will appear in the display window. If "PF" appears at any time, a power failure has occurred. Turn the SELECTOR control knob to the RESET position, press the ENTER button, and follow the clock setting instructions in the "Clock" section. Oven Selector Knob All cooking functions are set with the SELECTOR knob. Once a cycle is complete, turn the SELECTOR knob to the RESET position to select a new function or to turn off the oven. Cooking functions: Bake, Broil, Convect Bake, Convect Roast, Proof, Auto Steam and Select Steam. Oven Set Knob All Auto and Select Steam options, along with all temperature and time adjustments, are set with the SET knob. All temperature adjustments are displayed in 5°F (2.8°C) increments. Auto Steam settings: Meats, Poultry, Fish, Bread and Desserts Auto Steam settings display temperature and time settings to guide the cooking process. These may be changed according to recipe directions. Select Steam settings: High Steam, Low Steam and Keep Warm Enter and Cancel The ENTER button begins any oven function. The CANCEL button stops any oven function except for the Clock/Time of Day. After canceling an operation, "StOP" will be displayed and "Oven On" indicator light will turn off to show the function was canceled. To exit from the stop mode, turn the selector knob to RESET. Once the oven is turned on, a cooling fan will begin to operate and continue operating until after the oven has been turned off. This is normal. Clock This is a 12-hour clock and does not show a.m. or p.m. To Set: 1. Turn the SELECTOR knob to the RESET position. 2. Press and hold the ENTER button until the CLOCK indicator light begins to blink. Release the ENTER button. 3. Turn the SET knob to set the time of day. 4. Press the ENTER button to accept time on display. To Change: Repeat steps 2-4 to change time of day on the display. Water Usage for Steam Functions Water Level When you are using the steam functions, the water level indicator lights will show in the display, indicating the level of the water in the reservoir. NOTE: The range must be set to one of the steam functions in order to fill the system with water. 11
-
 1
1 -
2
-
3
-
4
-
5
-
 6
6 -
 7
7 -
 8
8 -
 9
9 -
 10
10 -
 11
11 -
 12
12 -
 13
13 -
 14
14 -
 15
15 -
 16
16 -
17
-
18
-
19
-
20
-
21
-
22
-
23
-
24
-
25
-
26
-
27
-
28
-
29
-
30
-
31
-
32
-
33
-
34
-
35
-
36
-
37
-
38
-
39
-
40
-
41
-
42
-
43
-
44
-
45
-
46
-
47
-
48
-
49
-
50
-
51
-
52
-
53
-
54
-
55
-
56
-
57
-
58
-
59
-
60
-
61
-
62
-
63
-
64
-
65
-
66
-
67
-
68
-
69
-
70
-
71
-
72
 |
 |
