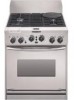
KitchenAid KDRP707RSS Use and Care Guide - Page 13
Aluminum Foil, Bakeware, Preheating, Changing Oven Timer or Temperature, Oven Temperature
 |
View all KitchenAid KDRP707RSS manuals
Add to My Manuals
Save this manual to your list of manuals |
Page 13 highlights
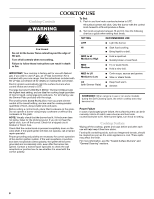
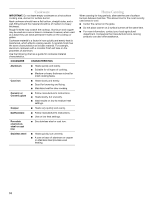
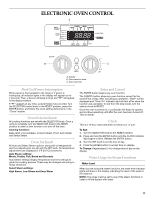
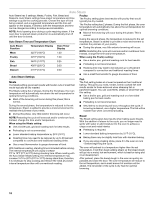
Aluminum Foil IMPORTANT: Do not line the oven bottom with any type of foil, liners or cookware because permanent damage will occur to the oven bottom finish. ■ Do not cover food with aluminum foil when convection or steam-assisted cooking. ■ For best cooking results, do not cover entire rack with foil because air must be able to move freely. ■ To catch spills, place foil on rack below dish. Make sure foil is at least ½" (1.3 cm) larger than the dish and that it is turned up at the edges. Bakeware The bakeware material affects cooking results. Follow manufacturer's recommendations and use the bakeware size recommended in the recipe. Use the following chart as a guide. BAKEWARE/ RESULTS RECOMMENDATIONS Light colored ■ aluminum ■ Light golden crusts ■ Even browning Use temperature and time recommended in recipe. Dark aluminum and other bakeware with dark, dull and/or nonstick finish ■ Brown, crisp crusts ■ May need to reduce baking temperatures slightly. ■ Use suggested baking time. ■ For pies, breads and casseroles, use temperature recommended in recipe. ■ Place rack in center of oven. Insulated cookie sheets or baking pans ■ Place in the bottom third of oven. ■ May need to increase baking time. ■ Little or no bottom browning Stainless steel ■ Light, golden crusts ■ Uneven browning ■ May need to increase baking time. Stoneware/Baking stone ■ Crisp crusts ■ Follow manufacturer's instructions. Ovenproof glassware, ceramic glass or ceramic ■ Brown, crisp crusts ■ May need to reduce baking temperatures slightly. Preheating The time the oven takes to preheat will vary according to the set temperature. It will also vary according to the existing oven cavity temperature, which is measured by the oven cavity sensor. It is normal for the temperature showing on the display and the actual oven temperature to differ. After a temperature is set and ENTER is pressed, the oven begins to preheat once the door is closed. The display will alternate between "PrE" and actual temperature as the oven preheats. When the set temperature is reached, a tone will sound. If the oven timer has been set, the oven time will begin to count down. Limit opening the oven door while the oven is preheating as this will prolong the preheating cycle. Changing Oven Timer or Temperature Time and temperature can be changed during the cooking cycles. To change time and/or temperature: 1. Press the ENTER button. The set temperature is displayed with the "F" flashing in the display. Turn the Set Knob to the desired temperature. 2. Press the ENTER button again. The set time is displayed with the Cook Time indicator light flashing. Turn the Set Knob to the desired time. 3. Press the ENTER button again, and the changes will take effect. NOTE: Changing the temperature and/or time setting is a 3-step process. Each time the Enter button is pressed, the control advances to the next step. It is not necessary to change both the temperature and time settings. To skip a step, press the Enter button to advance to the next step. Oven Temperature Calibration If you think the oven temperature is operating too hot or cold, the temperature may be recalibrated. 1. Make sure the oven control is off 2. Turn the selector knob to BAKE, CONVECT ROAST, or CONVECT BAKE. 3. Press the cancel key and the enter key simultaneously and hold for 5 seconds. The display will show "StOP." 4. After 5 seconds the display will show a blinking "0" Indicating you are in the Oven Temperature Calibration mode. Release the CANCEL and ENTER key. 5. Turn the SET knob to increase or decrease the temperature in increments of 5° +/-30°F. A minus sign means the oven will be cooler by the displayed amount. The absence of a sign means the oven will be warmer by the displayed amount. 6. Press the ENTER key to accept the change and "StOP" will be displayed. 7. Turn the SELECTOR knob back to RESET to end calibration. NOTE: Changing the temperature calibration in one mode will not effect the other modes. 13
-
 1
1 -
2
-
3
-
4
-
5
-
6
-
7
-
 8
8 -
 9
9 -
 10
10 -
 11
11 -
 12
12 -
 13
13 -
 14
14 -
 15
15 -
 16
16 -
 17
17 -
 18
18 -
19
-
20
-
21
-
22
-
23
-
24
-
25
-
26
-
27
-
28
-
29
-
30
-
31
-
32
-
33
-
34
-
35
-
36
-
37
-
38
-
39
-
40
-
41
-
42
-
43
-
44
-
45
-
46
-
47
-
48
-
49
-
50
-
51
-
52
-
53
-
54
-
55
-
56
-
57
-
58
-
59
-
60
-
61
-
62
-
63
-
64
-
65
-
66
-
67
-
68
-
69
-
70
-
71
-
72
 |
 |
