KitchenAid KDTF924PPS Owners Manual - Page 18
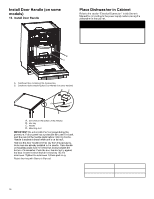
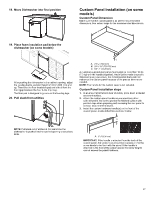
Align the two door studs to the referenced tracks on the door
 |
View all KitchenAid KDTF924PPS manuals
Add to My Manuals
Save this manual to your list of manuals |
Page 18 highlights
4. Place the custom panel with the face side down on the blanket, and note the planned top and bottom of the panel if applicable. C B 9. Attach double sided adhesive to the door panel in the lower half, to temporarily aid in door alignment. These pieces of adhesive can be removed later after getting all the holes perfectly aligned. A Double sided adhesive 10. Insert one of the wood blocks from the packaging across the door opening to prop the door slightly open. 11. Align the two door studs to the referenced tracks on the door, lifting up the door until the top panel is flush with the top of the dishwasher door. A. 235/8" (600 mm) B. 221/16" (560 mm) C. 29/16" (65 mm) 5. Using a tape measure, measure the top, center and bottom width of the panel, and mark the center location with either the edge of a tape piece or with a fine point pencil. 6. Using the straight edge draw a line connecting all the marked center lines so that the center of the panel is identified. 7. Using the provided template, align the centerline of the template with the center line of the door. 12. While holding the alignment, press on the lower section of the door, to allow the double sided tape to grab and hold your alignment. Awl Center punch 8. Using a center punch or awl, mark the 2 locations on the template to be used for attaching the door studs. Remove the template. Attach the 2 door studs to custom panel using the included screws. B C A 13. If this process needs adjusting, Use a plastic putty knife between the panel and the door to relieve the double sided tape and free the panel. 14. Open the door and panel together to the fully open position, making sure the panel has not shifted. A. 3.5 mm x 18 mm Phillips head screw (2) B. #2 Phillips screwdriver C. Studs 18
-
 1
1 -
2
-
3
-
4
-
5
-
6
-
7
-
8
-
9
-
10
-
11
-
12
-
 13
13 -
 14
14 -
 15
15 -
 16
16 -
 17
17 -
 18
18 -
 19
19 -
 20
20 -
 21
21 -
 22
22 -
 23
23 -
24
-
25
-
26
-
27
-
28
-
29
-
30
-
31
-
32
-
33
-
34
-
35
-
36
-
37
-
38
-
39
-
40
-
41
-
42
-
43
-
44
-
45
-
46
-
47
-
48
-
49
-
50
-
51
-
52
-
53
-
54
-
55
-
56
-
57
-
58
-
59
-
60
-
61
-
62
-
63
-
64
 |
 |
