KitchenAid KDTF924PPS Owners Manual - Page 22
Final Installation Check, Open and close door, Align Dishwasher Flush to Cabinet
 |
View all KitchenAid KDTF924PPS manuals
Add to My Manuals
Save this manual to your list of manuals |
Page 22 highlights
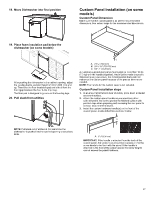
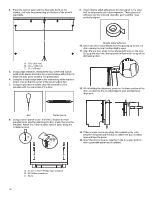
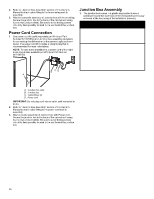
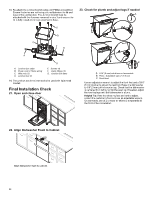
13. Re-attach the junction box lid using a #2 Phillips screwdriver. Ensure that wires are not being pinched between the lid and base of the junction box. The Junction box lid must be attached with the 4 screws removed in step 3 and ensure the lid is fully closed and snugly attached to base. 23. Check for plumb and adjust legs if needed A E C A D F B G A. Junction box cable B. Power cord or Home wiring C. Wire nuts (3) D. Junction box lid E. Screws (4) F. Cable fittings (2) G. Junction box base 14. The junction box is not intended to be used with rigid metal conduit. Final Installation Check 21. Open and close door B C A. 5/16" (8 mm) nut drivers or hexsockets B. Pliers - Adjustable upto 2" (5.0 cm) C. Small level Use an adjustable wrench to adjust the front feet and a 5/16" (8 mm) socket to adjust the rear foot. Raise the dishwasher to 1/8" (3 mm) of the counter top. Check that the dishwasher is centered from left to right in the opening. If needed, adjust the leveling legs until the dishwasher is plumb. Helpful Tip: If the front leveling feet are hard to adjust, protect the customer's floor and use an adjustable wrench. Or alternately, use of 2 or more air shims to temporarily lift the front of the dishwasher. 22. Align Dishwasher Flush to Cabinet Align dishwasher flush to cabinet. 22
-
 1
1 -
2
-
3
-
4
-
5
-
6
-
7
-
8
-
9
-
10
-
11
-
12
-
13
-
14
-
15
-
16
-
 17
17 -
 18
18 -
 19
19 -
 20
20 -
 21
21 -
 22
22 -
 23
23 -
 24
24 -
 25
25 -
 26
26 -
 27
27 -
28
-
29
-
30
-
31
-
32
-
33
-
34
-
35
-
36
-
37
-
38
-
39
-
40
-
41
-
42
-
43
-
44
-
45
-
46
-
47
-
48
-
49
-
50
-
51
-
52
-
53
-
54
-
55
-
56
-
57
-
58
-
59
-
60
-
61
-
62
-
63
-
64
 |
 |
