KitchenAid KDTF924PPS Owners Manual - Page 24
For Frame less Cabinets, For Face Frame Cabinets, Break end of the brackets
 |
View all KitchenAid KDTF924PPS manuals
Add to My Manuals
Save this manual to your list of manuals |
Page 24 highlights
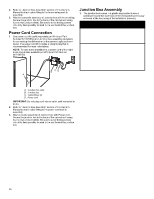
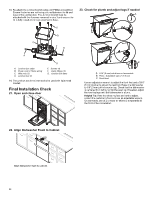
26. For Frame less Cabinets 1. Remove upper rack for easier access. 27. For Face Frame Cabinets 1. Use four Metal brackets (included) between Face frame and the side wall panels of the dishwasher. 2. Each bracket needs to be inserted into the slots at the side panel of the dishwasher and turn the brackets by 90 degrees towards the cabinet opening. 3. Once the spacers are locked into position, Secure the dishwasher to cabinet with four 3.5 mm x 18 mm Phillips-head screws (included). B C A 2. Use four Thick plastic (included) spacers between cabinet wall and the side wall panels of the dishwasher. 3. Each spacers has three positions depending on the gap available, insert the spacer into the side panel of the dishwasher and turn the spacer by 90 degrees. A B C A. 3.5 mm x 18 mm B. Metal brackets (4) Phillips-head screws (4) C. Side gap covers (2) NOTE: � The dishwasher must be secured to keep it from shifting when the door is opened or closed. � Do not drop screws into bottom of dishwasher. 28. Break end of the brackets Depending on the depth of the gap between dishwasher and the face of the frame, Break off the end of the brackets along the scored line using pliers to adjust the required length of the bracket. Use sandpaper to smooth any burrs. C A. 3.5 mm x 18 mm B. Thick plastic spacers (4) Phillips-head screws (4) C. Side gap covers (2) A 4. Once the spacers are locked into the position. Secure the dishwasher to cabinet with four 3.5 mm x 18 mm Phillips-head screws (included). NOTE: � The dishwasher must be secured to keep it from shifting when the door is opened or closed. � Do not drop screws into bottom of dishwasher. A. Score line 24
-
 1
1 -
2
-
3
-
4
-
5
-
6
-
7
-
8
-
9
-
10
-
11
-
12
-
13
-
14
-
15
-
16
-
17
-
18
-
 19
19 -
 20
20 -
 21
21 -
 22
22 -
 23
23 -
 24
24 -
 25
25 -
 26
26 -
 27
27 -
 28
28 -
 29
29 -
30
-
31
-
32
-
33
-
34
-
35
-
36
-
37
-
38
-
39
-
40
-
41
-
42
-
43
-
44
-
45
-
46
-
47
-
48
-
49
-
50
-
51
-
52
-
53
-
54
-
55
-
56
-
57
-
58
-
59
-
60
-
61
-
62
-
63
-
64
 |
 |
