KitchenAid KDTF924PPS Owners Manual - Page 25
Choose Anchor Attachment Method, Connect Water Line to House Shutoff Valve, Connect Drain Hose
 |
View all KitchenAid KDTF924PPS manuals
Add to My Manuals
Save this manual to your list of manuals |
Page 25 highlights
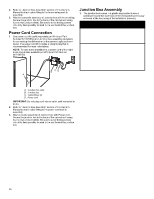
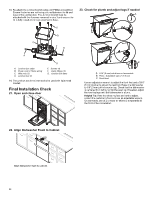
29. Check inner spacing Remove the short screws from the package and insert them into four of the six mounting holes provided. Using a Phillips head screw driver, screw them into the cabinet. If longer screws are needed, the installer will need to provide. Connect Water Line to House Shutoff Valve 31. Attach water supply line Open door and check that space between dishwasher cabinet opening and tub is equal on both sides. If spacing is not equal, loosen bracket screws and shift tub. Tighten bracket screws. Choose Anchor Attachment Method IMPORTANT: The dishwasher must be secured to the cabinet as one of the final steps. Prepare the dishwasher for this by attaching the dishwasher to the cabinets using at least 4 of the 6 available screw holes. 30. Cabinet Attachment: A B Attach the water supply line (flexible braided line) to the hot water line using a connection configuration that is in compliance with local codes and ordinances. The water supply to the dishwasher should have a manual shutoff valve located under the sink. Connect Drain Hose 32. Connect drain hose Connect drain hose to waste tee or waste disposer using one of the following options: � Option A: Waste disposer - no air gap � Option B: No waste disposer - no air gap � Option C: Waste disposer - with air gap � Option D: No waste disposer - with air gap IMPORTANT: The drain hose connection of the disposer or a waste tee must be made before the drain trap and at least 20" (508 mm) above the floor where the dishwasher will be installed. Helpful Tip: To reduce vibration of the hose, keep the hose away from the floor. A B AB A. #3.5 x 18 mm screws (4) for Cabinet mount B. #2 Phillips screwdriver 25
-
 1
1 -
2
-
3
-
4
-
5
-
6
-
7
-
8
-
9
-
10
-
11
-
12
-
13
-
14
-
15
-
16
-
17
-
18
-
19
-
 20
20 -
 21
21 -
 22
22 -
 23
23 -
 24
24 -
 25
25 -
 26
26 -
 27
27 -
 28
28 -
 29
29 -
 30
30 -
31
-
32
-
33
-
34
-
35
-
36
-
37
-
38
-
39
-
40
-
41
-
42
-
43
-
44
-
45
-
46
-
47
-
48
-
49
-
50
-
51
-
52
-
53
-
54
-
55
-
56
-
57
-
58
-
59
-
60
-
61
-
62
-
63
-
64
 |
 |
