Kodak ESP 7250 Extended user guide - Page 15
Setting up an IP address, Subnet Mask, a Gateway Address, and a DNS Server address. Press - manual
 |
View all Kodak ESP 7250 manuals
Add to My Manuals
Save this manual to your list of manuals |
Page 15 highlights
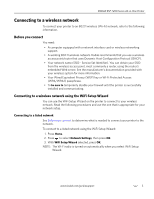
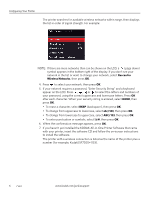
KODAK ESP 7200 Series All-in-One Printer Setting up an IP address IMPORTANT: You should only need to set up an IP address for your printer if you are having a problem with connecting. Typically, it is not necessary to set up an IP address. This procedure is for advanced users who know how to obtain the IP address for the printer. All IP address entries have the following format: 000.000.000.000. Within each three-digit grouping, the number must be right-justified. If an address or subnet mask has only one or two characters between the periods, include one or two leading zeros in front of that number. For example: The address as it may appear in your documentation 149.89.138.149 149.2.40.149 How to enter the address in the printer menu 149.089.138.149 149.002.040.149 For information about obtaining the printer IP address, go to www.kodak.com/go/inkjetnetworking. To set up your IP address on the printer: 1. Press Home. 2. Press to select Network Settings, then press OK. 3. Press to select Advanced IP Address Setup, then press OK. 4. Press OK again to continue. 5. Select one of the following, then press OK: • Dynamic (DHCP) • Automatic (Private) • Manual (Static) 6. If you selected Manual (Static), you are prompted to enter an IP address, a Subnet Mask, a Gateway Address, and a DNS Server address. Press OK after each entry. Use the navigation buttons to enter each digit of the numbers. Consult your Internet service provider or network administrator for more information. www.kodak.com/go/aiosupport 9
-
 1
1 -
2
-
3
-
4
-
5
-
6
-
7
-
8
-
9
-
 10
10 -
 11
11 -
 12
12 -
 13
13 -
 14
14 -
 15
15 -
 16
16 -
 17
17 -
 18
18 -
 19
19 -
 20
20 -
21
-
22
-
23
-
24
-
25
-
26
-
27
-
28
-
29
-
30
-
31
-
32
-
33
-
34
-
35
-
36
-
37
-
38
-
39
-
40
-
41
-
42
-
43
-
44
-
45
-
46
-
47
-
48
-
49
-
50
-
51
-
52
-
53
-
54
-
55
-
56
-
57
-
58
-
59
-
60
-
61
-
62
-
63
-
64
-
65
-
66
-
67
-
68
-
69
-
70
-
71
-
72
-
73
-
74
-
75
-
76
-
77
-
78
-
79
-
80
-
81
-
82
-
83
-
84
-
85
-
86
-
87
-
88
-
89
-
90
-
91
-
92
 |
 |