Kodak ESP 7250 Extended user guide - Page 17
Adding a network connection to a USB-connected computer, Changing from USB to wireless connection - driver
 |
View all Kodak ESP 7250 manuals
Add to My Manuals
Save this manual to your list of manuals |
Page 17 highlights
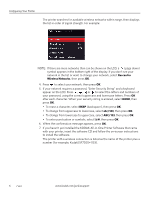
KODAK ESP 7200 Series All-in-One Printer • If your wireless all-in-one printer (example: KodakESP7200+1133) is listed: a. Highlight the all-in-one printer that is connected to your network. b. Select Yes, my printer is listed, then click Next. When your printer is detected, driver installation begins. 2. When driver installation is complete, click Done. On a computer with MAC OS: 1. From the dock, open System Preferences. 2. Click Print & Fax. 3. On a computer with WINDOWS OS: a. Click the + sign to add the printer. b. Select the printer from the list of available printers, then click Add. Adding a network connection to a USB-connected computer You can change the way you connect to your printer at any time. Changing from USB to wireless connection To change the printer connection type from USB to a wireless (Wi-Fi) network: If your printer is connected to a computer with WINDOWS OS: 1. On the printer control panel, press Home. 2. Press to select Network Settings, then press OK. 3. Press to select View Network Configuration, press OK, then confirm you have an IP address. 4. If you have not already done so, connect your printer to your wireless network. See Connecting to a wireless network, page 5. 5. On your computer, disable any firewall you have installed until you have successfully completed the installation For more information on firewalls, go to www.kodak.com/go/inkjetnetworking. 6. Select Start > All Programs > Kodak > Kodak Printer Network Setup Utility. • If your wireless all-in-one printer (example: KodakESP7200+1133) is not listed: a. Select No, my printer is not listed, then click Next. b. From the drop-down list, select your printer: ESP7200 Series. c. Select Network - Wireless/WiFi, then click Next. When your printer is detected, driver installation begins. • If your wireless all-in-one printer (example: KodakESP7200+1133) is listed: a. Highlight the all-in-one printer that is connected to your network. b. Select Yes, my printer is listed, then click Next. When your printer is detected, driver installation begins. www.kodak.com/go/aiosupport 11
-
 1
1 -
2
-
3
-
4
-
5
-
6
-
7
-
8
-
9
-
10
-
11
-
 12
12 -
 13
13 -
 14
14 -
 15
15 -
 16
16 -
 17
17 -
 18
18 -
 19
19 -
 20
20 -
 21
21 -
 22
22 -
23
-
24
-
25
-
26
-
27
-
28
-
29
-
30
-
31
-
32
-
33
-
34
-
35
-
36
-
37
-
38
-
39
-
40
-
41
-
42
-
43
-
44
-
45
-
46
-
47
-
48
-
49
-
50
-
51
-
52
-
53
-
54
-
55
-
56
-
57
-
58
-
59
-
60
-
61
-
62
-
63
-
64
-
65
-
66
-
67
-
68
-
69
-
70
-
71
-
72
-
73
-
74
-
75
-
76
-
77
-
78
-
79
-
80
-
81
-
82
-
83
-
84
-
85
-
86
-
87
-
88
-
89
-
90
-
91
-
92
 |
 |