LG LSC27914ST Owner's Manual - Page 10
How To Control The Amount Of, Water Supplied To Ice Maker
 |
View all LG LSC27914ST manuals
Add to My Manuals
Save this manual to your list of manuals |
Page 10 highlights
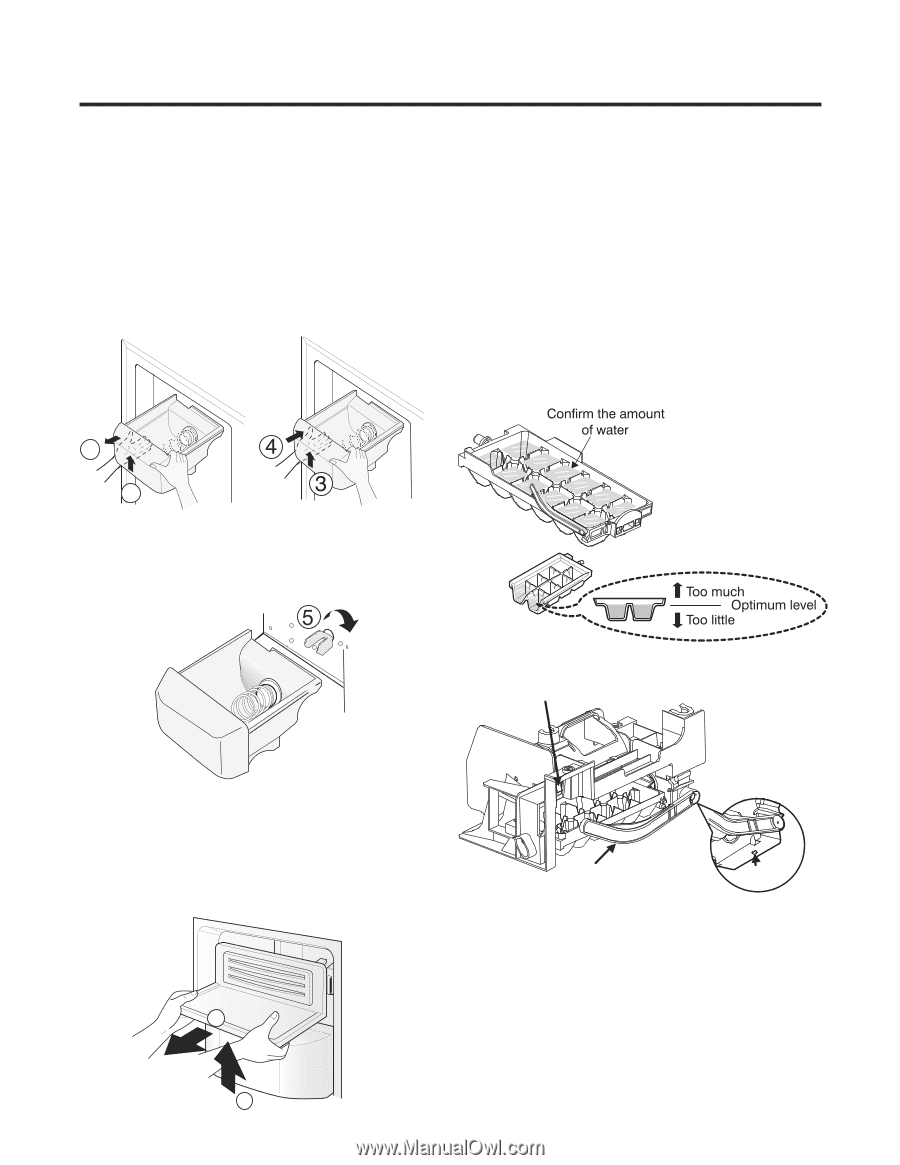
5. HOW TO CONTROL THE AMOUNT OF 2) Turn on the electricity after connecting water pipe. WATER SUPPLIED TO ICE MAKER 1) Press the test switch under the icemaker for two seconds as shown below. 1. DISASSEMBLY ICE STORAGE BIN 2) The bell rings (ding ~ dong), the ice tray rotates, and water comes out the icemaker water tube. NOTE: Use both hands to remove the ice bin to avoid dropping it. If the ice bin does not slide into place easily, twist the drive device slightly. 3) The water is supplied into the tray two or three times. The amount is small each time. Put a container under the ice tray and press test switch. 4) When the ice tray rotates, the water in it will spill. Collect the • Hold the ice storage bin as shown in the right figure spilled water and discard it. and pull it out while slightly lifting it ‚ . 5) When ice tray has finished rotation, water comes out the water tube. Check the amount that goes into the ice tray. (Refer to the drawing below. The optimum amount is 110cc. (Almost 4 oz.)). 2 1 • To assemble the ice storage bin, push it int ƒ while slightly lifting it „ . Make sure it is fully engaged into the auger drive … . Power Switch ON/OFF 2. DISASSEMBLY ICEMAKER COVER If you need acces to the Icemaker, follow these steps: • Lift the ice shelf as shown in the right figure and pull it out ‚ . Feeler Arm Test switch (On the lower part of icemaker) 2 1 * It is acceptable is the adjusted water level is less than the optimum level. - 9 -
-
 1
1 -
2
-
3
-
4
-
 5
5 -
 6
6 -
 7
7 -
 8
8 -
 9
9 -
 10
10 -
 11
11 -
 12
12 -
 13
13 -
 14
14 -
 15
15 -
16
-
17
-
18
-
19
-
20
-
21
-
22
-
23
-
24
-
25
-
26
-
27
-
28
-
29
-
30
-
31
-
32
-
33
-
34
-
35
-
36
-
37
-
38
-
39
-
40
-
41
-
42
-
43
-
44
-
45
-
46
-
47
-
48
-
49
-
50
-
51
-
52
-
53
-
54
-
55
-
56
-
57
-
58
-
59
-
60
-
61
-
62
-
63
-
64
-
65
-
66
-
67
-
68
-
69
-
70
-
71
-
72
-
73
-
74
-
75
-
76
-
77
-
78
-
79
-
80
-
81
-
82
-
83
-
84
-
85
-
86
-
87
-
88
-
89
-
90
-
91
-
92
-
93
-
94
-
95
-
96
-
97
-
98
-
99
-
100
-
101
-
102
-
103
-
104
-
105
-
106
-
107
-
108
-
109
-
110
-
111
-
112
-
113
-
114
-
115
-
116
-
117
-
118
-
119
-
120
-
121
-
122
-
123
-
124
-
125
-
126
-
127
-
128
-
129
-
130
-
131
-
132
-
133
-
134
-
135
-
136
-
137
-
138
-
139
-
140
 |
 |