LG LSC27914ST Owner's Manual - Page 13
Handle Removal - door handle
 |
View all LG LSC27914ST manuals
Add to My Manuals
Save this manual to your list of manuals |
Page 13 highlights
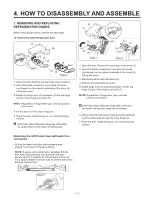
Reinstalling the right (Refrigerator) door (1) (2) (3) (4) (5) (3) Rivet Type 1 (4) (5) Type 2 1. Place the door onto the lower hinge pin. 2. Fit top hinge (4) over hinge lever latch (5) into place. Rotate lever (3) counterclockwise to secure hinge. NOTE: Regardless of hinge lever type. removal process is the same. 3. Hook tab on switch side of corner under edge of wire opening in cabinet top. Position cover (2) into place. Insert and tighten cover screw (1). Reinstalling the left (Freezer) door 2. HANDLE REMOVAL NOTE: It is ALWAYS recommended to remove the refrigerator doors when it is necessary to move the refrigerator through a narrow opening. If necessary, follow the directions below to remove the door handles. • Grasp the handle tigthtly with both hands and slide the handle up (1) (this may require some force). • The keyhole slots (2) on the back of the handle allow the handle to separate from the mounting screws (3). • Then pull the handle towards you. CAUTION: When trying to remove or install the handle if hit wit a hammer, it could be damaged or broken. CAUTION: When you assemble or dissasemble handle, you must push and pull with moment force. (2) (1) (4) (5) (6) (7) Type 1 (3) (7) (5) (6) Rivet Type 2 Screws mounted on door 1. Feed the water tubes through the lower hinge pin and place the door onto the lower hinge pin. 2. Fit top hinge (6) over hinge lever latch (7) and into place. Rotate lever (5) clockwise to secure hinge NOTE: Regardless of hinge lever type, removal process is the same. 3. Install the grounding screw (4) and connect all the wire harnesses (3). 4. Hook tab on door switch side of cover (2) under edge of wire opening in cabinet top. Position cover into place. Insert and tighten cover screw (1). 5. Reconnect the water tubes by inserting the tubes into the connectors. - 12 - Keyhole slots on back of handle
-
 1
1 -
2
-
3
-
4
-
5
-
6
-
7
-
 8
8 -
 9
9 -
 10
10 -
 11
11 -
 12
12 -
 13
13 -
 14
14 -
 15
15 -
 16
16 -
 17
17 -
 18
18 -
19
-
20
-
21
-
22
-
23
-
24
-
25
-
26
-
27
-
28
-
29
-
30
-
31
-
32
-
33
-
34
-
35
-
36
-
37
-
38
-
39
-
40
-
41
-
42
-
43
-
44
-
45
-
46
-
47
-
48
-
49
-
50
-
51
-
52
-
53
-
54
-
55
-
56
-
57
-
58
-
59
-
60
-
61
-
62
-
63
-
64
-
65
-
66
-
67
-
68
-
69
-
70
-
71
-
72
-
73
-
74
-
75
-
76
-
77
-
78
-
79
-
80
-
81
-
82
-
83
-
84
-
85
-
86
-
87
-
88
-
89
-
90
-
91
-
92
-
93
-
94
-
95
-
96
-
97
-
98
-
99
-
100
-
101
-
102
-
103
-
104
-
105
-
106
-
107
-
108
-
109
-
110
-
111
-
112
-
113
-
114
-
115
-
116
-
117
-
118
-
119
-
120
-
121
-
122
-
123
-
124
-
125
-
126
-
127
-
128
-
129
-
130
-
131
-
132
-
133
-
134
-
135
-
136
-
137
-
138
-
139
-
140
 |
 |
