LG LSC27914ST Owner's Manual - Page 12
How To Disassembly And Assemble
 |
View all LG LSC27914ST manuals
Add to My Manuals
Save this manual to your list of manuals |
Page 12 highlights
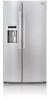
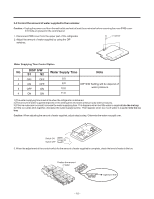
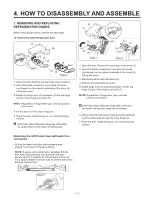
4. HOW TO DISASSEMBLY AND ASSEMBLE 1. REMOVING AND REPLACING REFRIGERATOR DOORS Before removing the doors, remove the base grille. To remove the right (refrigerator) door: (1) (2) (3) (4) (5) Type 1 (4) (5) (3) Rivet Type 2 1. Open the door. Remove the top hinge cover screw (1). 2. Use a flat blade screwdriver to pry back the hooks (not shown) on the cabinet underside of the cover (2). Lift up the cover. 3.Rotate the hinge lever (3) clockwise. Lift the top hinge (4) free of the hinge lever latch (5). NOTE: Regardless of hinge lever type, removal process is the same. 4. Lift the door from the lower hinge pin. 5. Place the door, inside facing up, on a nonscratching surface. CAUTION: When lifting the hinge free of the latch, be careful that the door does not fall forward. (2) (1) (4) (5) (6) (7) Type 1 (3) (5) (7) (6) Rivet Type 2 1. Open the door. Remove the top hinge cover screw (1). 2. Use a flat blade screwdriver to pry back the hooks (not shown) on the cabinet underside of the cover (2). Lift up the cover. 3. Disconnect all the wire harnesses (3). 4. Remove the grounding screw (4). 5.Rotate hinge lever (5) counterclockwise. Lift the top hinge (6) free of the hinge lever latch (7). NOTE: Regardless of hinge lever type, removal process is the same. CAUTION: When lifting the hinge free of the latch, be careful that the door does not fall forward. 6. Lift the door from the lower hinge pin being careful to pull the water lines through the lower hinge pin. 7. Place the door, inside facing up, on a nonscratching surface. Removing the left (freezer) door with water line connection. • Pull up the water feed tube while pressing area (Figure 1) as shown in the figure below. • NOTE: If a tube end is deformed or abraded, trim the part away. Disconnecting the tube under the door causes about 0.13 gallons (0.5 liters) water to flow out. Put a large container at end of tube to prevent water from draining onto the floor. Figure 1 - 11 -
-
 1
1 -
2
-
3
-
4
-
5
-
6
-
 7
7 -
 8
8 -
 9
9 -
 10
10 -
 11
11 -
 12
12 -
 13
13 -
 14
14 -
 15
15 -
 16
16 -
 17
17 -
18
-
19
-
20
-
21
-
22
-
23
-
24
-
25
-
26
-
27
-
28
-
29
-
30
-
31
-
32
-
33
-
34
-
35
-
36
-
37
-
38
-
39
-
40
-
41
-
42
-
43
-
44
-
45
-
46
-
47
-
48
-
49
-
50
-
51
-
52
-
53
-
54
-
55
-
56
-
57
-
58
-
59
-
60
-
61
-
62
-
63
-
64
-
65
-
66
-
67
-
68
-
69
-
70
-
71
-
72
-
73
-
74
-
75
-
76
-
77
-
78
-
79
-
80
-
81
-
82
-
83
-
84
-
85
-
86
-
87
-
88
-
89
-
90
-
91
-
92
-
93
-
94
-
95
-
96
-
97
-
98
-
99
-
100
-
101
-
102
-
103
-
104
-
105
-
106
-
107
-
108
-
109
-
110
-
111
-
112
-
113
-
114
-
115
-
116
-
117
-
118
-
119
-
120
-
121
-
122
-
123
-
124
-
125
-
126
-
127
-
128
-
129
-
130
-
131
-
132
-
133
-
134
-
135
-
136
-
137
-
138
-
139
-
140
 |
 |