Lenovo E49 (English) User Guide - Page 50
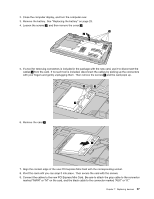
Close the computer display, and turn the computer over. Then reinstall the screws to secure
 |
View all Lenovo E49 manuals
Add to My Manuals
Save this manual to your list of manuals |
Page 50 highlights
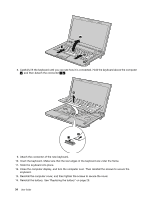
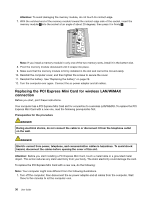
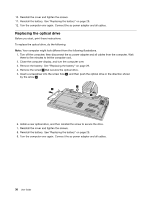
5 4 4 8. Carefully lift the keyboard until you can see how it is connected. Hold the keyboard above the computer 6 , and then detach the connector 7 8 . 6 8 7 9. Attach the connector of the new keyboard. 10. Insert the keyboard. Make sure that the rear edges of the keyboard are under the frame. 11. Slide the keyboard into place. 12. Close the computer display, and turn the computer over. Then reinstall the screws to secure the keyboard. 13. Reinstall the computer cover, and then tighten the screws to secure the cover. 14. Reinstall the battery. See "Replacing the battery" on page 29. 34 User Guide
-
 1
1 -
2
-
3
-
4
-
5
-
6
-
7
-
8
-
9
-
10
-
11
-
12
-
13
-
14
-
15
-
16
-
17
-
18
-
19
-
20
-
21
-
22
-
23
-
24
-
25
-
26
-
27
-
28
-
29
-
30
-
31
-
32
-
33
-
34
-
35
-
36
-
37
-
38
-
39
-
40
-
41
-
42
-
43
-
44
-
 45
45 -
 46
46 -
 47
47 -
 48
48 -
 49
49 -
 50
50 -
 51
51 -
 52
52 -
 53
53 -
 54
54 -
 55
55 -
56
-
57
-
58
-
59
-
60
-
61
-
62
-
63
-
64
-
65
-
66
-
67
-
68
-
69
-
70
-
71
-
72
-
73
-
74
-
75
-
76
-
77
-
78
 |
 |

4
4
5
8. Carefully lift the keyboard until you can see how it is connected. Hold the keyboard above the computer
6
, and then detach the connector
7
8
.
7
8
6
9. Attach the connector of the new keyboard.
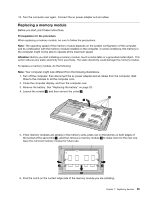
10. Insert the keyboard. Make sure that the rear edges of the keyboard are under the frame.
11. Slide the keyboard into place.
12. Close the computer display, and turn the computer over. Then reinstall the screws to secure the
keyboard.
13. Reinstall the computer cover, and then tighten the screws to secure the cover.
14. Reinstall the battery. See “Replacing the battery” on page 29.
34
User Guide