Lenovo ThinkCentre A58 User Manual - Page 139
If the adapter card is held in place by a retaining latch, press the adapter
 |
View all Lenovo ThinkCentre A58 manuals
Add to My Manuals
Save this manual to your list of manuals |
Page 139 highlights
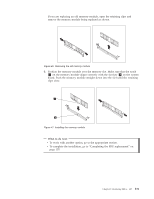
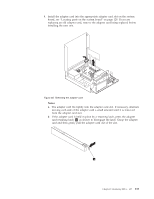
4. Install the adapter card into the appropriate adapter card slot on the system board, see "Locating parts on the system board" on page 129. If you are replacing an old adapter card, remove the adapter card being replaced before installing the new one. Figure 48. Removing the adapter card Notes: a. The adapter card fits tightly into the adapter card slot. If necessary, alternate moving each side of the adapter card a small amount until it is removed from the adapter card slot. b. If the adapter card is held in place by a retaining latch, press the adapter card retaining latch 1 as shown to disengage the latch. Grasp the adapter card and then gently pull the adapter card out of the slot. Chapter 9. Replacing FRUs - 607 133
-
 1
1 -
2
-
3
-
4
-
5
-
6
-
7
-
8
-
9
-
10
-
11
-
12
-
13
-
14
-
15
-
16
-
17
-
18
-
19
-
20
-
21
-
22
-
23
-
24
-
25
-
26
-
27
-
28
-
29
-
30
-
31
-
32
-
33
-
34
-
35
-
36
-
37
-
38
-
39
-
40
-
41
-
42
-
43
-
44
-
45
-
46
-
47
-
48
-
49
-
50
-
51
-
52
-
53
-
54
-
55
-
56
-
57
-
58
-
59
-
60
-
61
-
62
-
63
-
64
-
65
-
66
-
67
-
68
-
69
-
70
-
71
-
72
-
73
-
74
-
75
-
76
-
77
-
78
-
79
-
80
-
81
-
82
-
83
-
84
-
85
-
86
-
87
-
88
-
89
-
90
-
91
-
92
-
93
-
94
-
95
-
96
-
97
-
98
-
99
-
100
-
101
-
102
-
103
-
104
-
105
-
106
-
107
-
108
-
109
-
110
-
111
-
112
-
113
-
114
-
115
-
116
-
117
-
118
-
119
-
120
-
121
-
122
-
123
-
124
-
125
-
126
-
127
-
128
-
129
-
130
-
131
-
132
-
133
-
 134
134 -
 135
135 -
 136
136 -
 137
137 -
 138
138 -
 139
139 -
 140
140 -
 141
141 -
 142
142 -
 143
143 -
 144
144 -
145
-
146
-
147
-
148
-
149
-
150
-
151
-
152
-
153
-
154
-
155
-
156
-
157
-
158
-
159
-
160
-
161
-
162
-
163
-
164
-
165
-
166
-
167
-
168
-
169
-
170
-
171
-
172
-
173
-
174
-
175
-
176
-
177
-
178
-
179
-
180
-
181
-
182
-
183
-
184
-
185
-
186
-
187
-
188
-
189
-
190
-
191
-
192
-
193
-
194
-
195
-
196
-
197
-
198
-
199
-
200
-
201
-
202
-
203
-
204
-
205
-
206
-
207
-
208
-
209
-
210
-
211
-
212
-
213
-
214
-
215
-
216
-
217
-
218
-
219
-
220
-
221
-
222
-
223
-
224
-
225
-
226
-
227
-
228
-
229
-
230
-
231
-
232
-
233
-
234
-
235
-
236
-
237
-
238
-
239
-
240
-
241
-
242
-
243
-
244
-
245
-
246
-
247
-
248
-
249
-
250
-
251
-
252
-
253
-
254
-
255
-
256
-
257
-
258
-
259
-
260
-
261
-
262
-
263
-
264
-
265
-
266
-
267
-
268
-
269
-
270
-
271
-
272
-
273
-
274
-
275
-
276
-
277
-
278
-
279
-
280
-
281
-
282
-
283
-
284
-
285
-
286
-
287
-
288
-
289
-
290
-
291
-
292
 |
 |

4.
Install the adapter card into the appropriate adapter card slot on the system
board, see “Locating parts on the system board” on page 129. If you are
replacing an old adapter card, remove the adapter card being replaced before
installing the new one.
Notes:
a.
The adapter card fits tightly into the adapter card slot. If necessary, alternate
moving each side of the adapter card a small amount until it is removed
from the adapter card slot.
b.
If the adapter card is held in place by a retaining latch, press the adapter
card retaining latch
±1²
as shown to disengage the latch. Grasp the adapter
card and then gently pull the adapter card out of the slot.
Figure 48. Removing the adapter card
Chapter 9. Replacing FRUs - 607
133