Lenovo ThinkCentre Edge 72z Hardware Maintenance Manual (HMM) (May 2012) - Thi - Page 102
Slide the new hard disk drive with the bracket into the hard disk drive bay. Align the screw hole in
 |
View all Lenovo ThinkCentre Edge 72z manuals
Add to My Manuals
Save this manual to your list of manuals |
Page 102 highlights
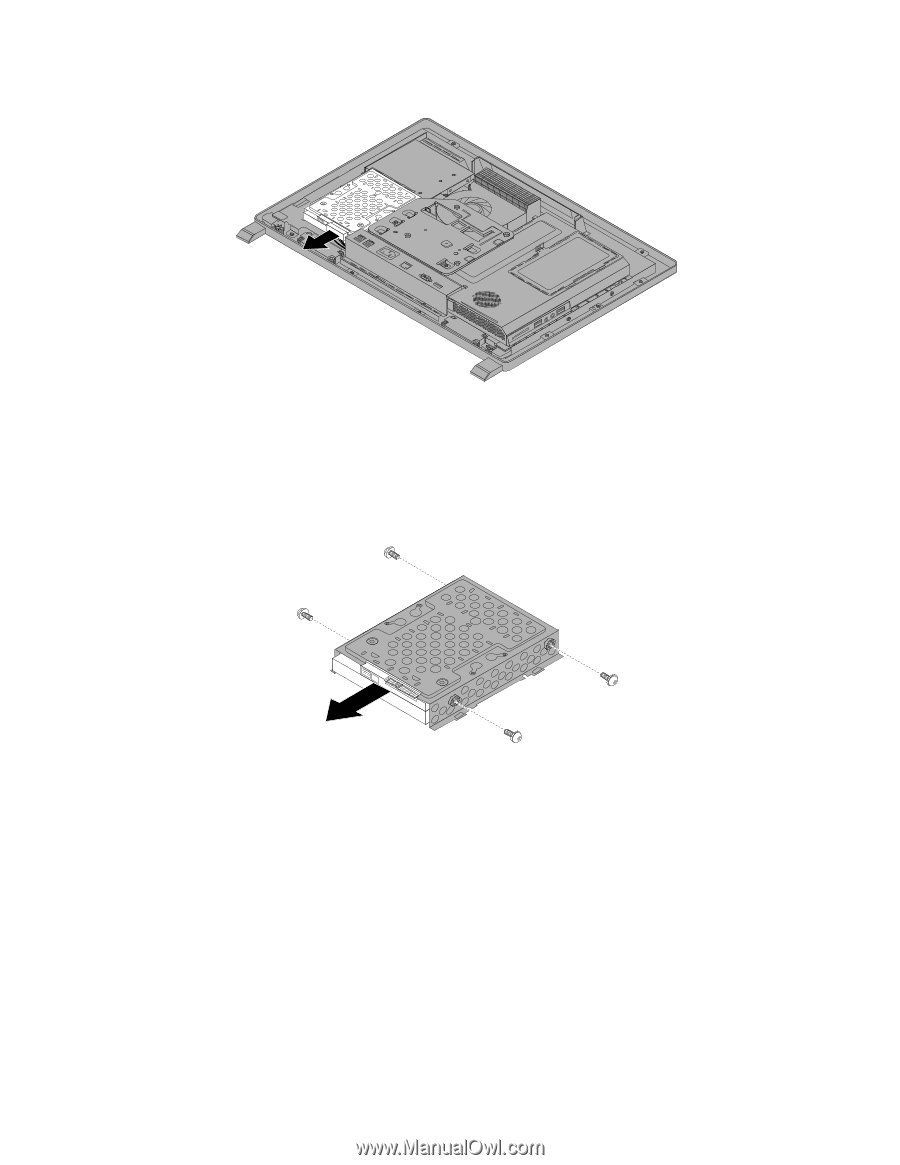
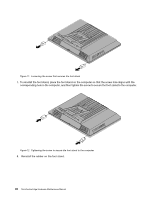
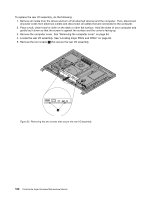
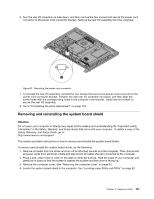
Figure 16. Removing the hard disk drive 6. Remove the four screws on the hard disk drive bracket, then remove the hard disk drive out of the bracket. Do not touch the circuit board on the bottom of the hard disk drive. Figure 17. Removing the hard disk drive out of the bracket 7. To install the new hard disk drive into the bracket, position the hard disk drive so that the four screw holes align with those in the bracket. 8. Install the four screws that secure the hard disk drive to the hard disk drive bracket. 9. Connect the hard disk drive cable. 10. Slide the new hard disk drive with the bracket into the hard disk drive bay. Align the screw hole in the hard disk drive with that in the chassis. 11. Install the screw to secure the hard disk drive bracket to the chassis. 12. Go to "Completing the parts replacement" on page 124. 96 ThinkCentre Edge Hardware Maintenance Manual
-
 1
1 -
2
-
3
-
4
-
5
-
6
-
7
-
8
-
9
-
10
-
11
-
12
-
13
-
14
-
15
-
16
-
17
-
18
-
19
-
20
-
21
-
22
-
23
-
24
-
25
-
26
-
27
-
28
-
29
-
30
-
31
-
32
-
33
-
34
-
35
-
36
-
37
-
38
-
39
-
40
-
41
-
42
-
43
-
44
-
45
-
46
-
47
-
48
-
49
-
50
-
51
-
52
-
53
-
54
-
55
-
56
-
57
-
58
-
59
-
60
-
61
-
62
-
63
-
64
-
65
-
66
-
67
-
68
-
69
-
70
-
71
-
72
-
73
-
74
-
75
-
76
-
77
-
78
-
79
-
80
-
81
-
82
-
83
-
84
-
85
-
86
-
87
-
88
-
89
-
90
-
91
-
92
-
93
-
94
-
95
-
96
-
 97
97 -
 98
98 -
 99
99 -
 100
100 -
 101
101 -
 102
102 -
 103
103 -
 104
104 -
 105
105 -
 106
106 -
 107
107 -
108
-
109
-
110
-
111
-
112
-
113
-
114
-
115
-
116
-
117
-
118
-
119
-
120
-
121
-
122
-
123
-
124
-
125
-
126
-
127
-
128
-
129
-
130
-
131
-
132
-
133
-
134
-
135
-
136
-
137
-
138
-
139
-
140
-
141
-
142
 |
 |