Lenovo ThinkPad Edge E125 (English) User Guide - Page 118
Date/Time menu, Security menu
 |
View all Lenovo ThinkPad Edge E125 manuals
Add to My Manuals
Save this manual to your list of manuals |
Page 118 highlights
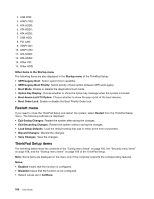
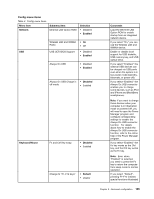
• Serial ATA (SATA): Specify the settings for the hard disk drive. • CPU: Specify the settings for the CPU. Date/Time menu If you need to set the current date and time of your computer, select Date/Time from the ThinkPad Setup menu. The following submenu is displayed: • System Date • System Time To change the date and time, do the following: 1. Using the up and down arrow keys, select the item to change-date or time. 2. Press Tab, Shift Tab, or Enter to select a field. 3. Type the date or time. Note: Another way to adjust date and time is pressing the "-" or "+" key. 4. Press F10 to save the changes and restart the system. Security menu If you need to set the security features of your computer, select Security from the ThinkPad Setup menu. Notes: • The default settings are already optimized for you. If you consider changing the computer configuration, proceed with extreme caution. Setting the configuration incorrectly might cause unexpected results. • In each submenu, you can enable a function by selecting Enabled, or disable it by selecting Disabled. The following submenu is displayed: • Password: Set password related functions. • UEFI BIOS Update Option: Specify the settings for Flash UEFI BIOS update. • Memory Protection: Specify the settings for the Data Execution Prevention feature. • Virtualization: Enable or disable the settings for Intel Virtualization Technology and Intel VT-d Feature. • I/O Port Access: Enable or disable the access to individual I/O ports. • Anti-Theft: Enable or disable UEFI BIOS interface to activate Anti-Theft services, such as Intel AT and Computrace. To set password related functions, go to the Security menu and select Password. The following submenu is displayed: • Supervisor Password • Lock UEFI BIOS Settings • Set Minimum Length • Password at restart • Power-On Password • Hard Disk x Password Notes: • Hard Disk 1 means the hard disk drive built into your computer. 102 User Guide
-
 1
1 -
2
-
3
-
4
-
5
-
6
-
7
-
8
-
9
-
10
-
11
-
12
-
13
-
14
-
15
-
16
-
17
-
18
-
19
-
20
-
21
-
22
-
23
-
24
-
25
-
26
-
27
-
28
-
29
-
30
-
31
-
32
-
33
-
34
-
35
-
36
-
37
-
38
-
39
-
40
-
41
-
42
-
43
-
44
-
45
-
46
-
47
-
48
-
49
-
50
-
51
-
52
-
53
-
54
-
55
-
56
-
57
-
58
-
59
-
60
-
61
-
62
-
63
-
64
-
65
-
66
-
67
-
68
-
69
-
70
-
71
-
72
-
73
-
74
-
75
-
76
-
77
-
78
-
79
-
80
-
81
-
82
-
83
-
84
-
85
-
86
-
87
-
88
-
89
-
90
-
91
-
92
-
93
-
94
-
95
-
96
-
97
-
98
-
99
-
100
-
101
-
102
-
103
-
104
-
105
-
106
-
107
-
108
-
109
-
110
-
111
-
112
-
 113
113 -
 114
114 -
 115
115 -
 116
116 -
 117
117 -
 118
118 -
 119
119 -
 120
120 -
 121
121 -
 122
122 -
 123
123 -
124
-
125
-
126
-
127
-
128
-
129
-
130
-
131
-
132
-
133
-
134
-
135
-
136
-
137
-
138
-
139
-
140
-
141
-
142
-
143
-
144
-
145
-
146
-
147
-
148
-
149
-
150
-
151
-
152
-
153
-
154
-
155
-
156
-
157
-
158
-
159
-
160
-
161
-
162
-
163
-
164
-
165
-
166
-
167
-
168
-
169
-
170
-
171
-
172
-
173
-
174
-
175
-
176
 |
 |