Lenovo ThinkPad T420 (English) User Guide - Page 174
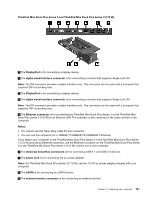
ThinkPad Port Replicator Series 3, ThinkPad Mini Dock Series 3, Front view, you can use its
 |
View all Lenovo ThinkPad T420 manuals
Add to My Manuals
Save this manual to your list of manuals |
Page 174 highlights
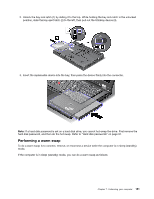
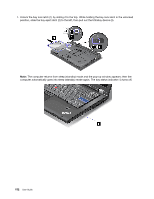
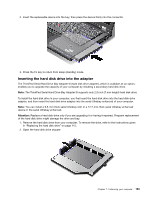
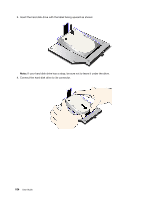
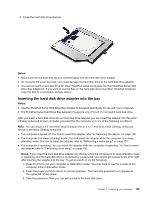
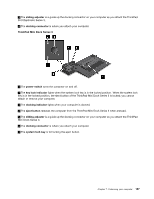
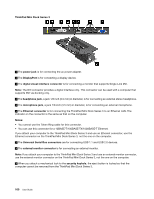
When you insert the hard disk drive adapter into the bay, make sure that you insert it firmly. If you want to secure your hard disk drive adapter, install a hex-head screw (included in the shipping contents) into the screw hole. ThinkPad Port Replicator Series 3, ThinkPad Mini Dock Series 3, ThinkPad Mini Dock Plus Series 3, and ThinkPad Mini Dock Plus Series 3 (170 W) After you attach your computer to the ThinkPad Port Replicator Series 3, the ThinkPad Mini Dock Series 3, the ThinkPad Mini Dock Plus Series 3, or the ThinkPad Mini Dock Plus Series 3 (170 W), you can use its connectors in place of the computer's. When the computer is attached to the ThinkPad Port Replicator Series 3, the ThinkPad Mini Dock Series 3, the ThinkPad Mini Dock Plus Series 3, or the ThinkPad Mini Dock Plus Series 3 (170 W), never pick up the assembly by taking hold of the computer alone. Always hold the whole assembly. For more details about the ThinkPad Port Replicator Series 3, the ThinkPad Mini Dock Series 3, the ThinkPad Mini Dock Plus Series 3, or the ThinkPad Mini Dock Plus Series 3 (170 W), refer to the following: • "Front view" on page 156 • "Rear view" on page 159 • "Attaching a ThinkPad Port Replicator Series 3, ThinkPad Mini Dock Series 3, ThinkPad Mini Dock Plus Series 3, or ThinkPad Mini Dock Plus Series 3 (170 W)" on page 162 • "Detaching a ThinkPad Port Replicator Series 3, ThinkPad Mini Dock Series 3, ThinkPad Mini Dock Plus Series 3, or the ThinkPad Mini Dock Plus Series 3 (170 W)" on page 164 • "Security feature" on page 166 • "Using the system lock key" on page 168 Front view ThinkPad Port Replicator Series 3 1 The power switch turns the computer on and off. 2 The eject button releases the computer from the ThinkPad Port Replicator Series 3 when pressed. 156 User Guide
-
 1
1 -
2
-
3
-
4
-
5
-
6
-
7
-
8
-
9
-
10
-
11
-
12
-
13
-
14
-
15
-
16
-
17
-
18
-
19
-
20
-
21
-
22
-
23
-
24
-
25
-
26
-
27
-
28
-
29
-
30
-
31
-
32
-
33
-
34
-
35
-
36
-
37
-
38
-
39
-
40
-
41
-
42
-
43
-
44
-
45
-
46
-
47
-
48
-
49
-
50
-
51
-
52
-
53
-
54
-
55
-
56
-
57
-
58
-
59
-
60
-
61
-
62
-
63
-
64
-
65
-
66
-
67
-
68
-
69
-
70
-
71
-
72
-
73
-
74
-
75
-
76
-
77
-
78
-
79
-
80
-
81
-
82
-
83
-
84
-
85
-
86
-
87
-
88
-
89
-
90
-
91
-
92
-
93
-
94
-
95
-
96
-
97
-
98
-
99
-
100
-
101
-
102
-
103
-
104
-
105
-
106
-
107
-
108
-
109
-
110
-
111
-
112
-
113
-
114
-
115
-
116
-
117
-
118
-
119
-
120
-
121
-
122
-
123
-
124
-
125
-
126
-
127
-
128
-
129
-
130
-
131
-
132
-
133
-
134
-
135
-
136
-
137
-
138
-
139
-
140
-
141
-
142
-
143
-
144
-
145
-
146
-
147
-
148
-
149
-
150
-
151
-
152
-
153
-
154
-
155
-
156
-
157
-
158
-
159
-
160
-
161
-
162
-
163
-
164
-
165
-
166
-
167
-
168
-
 169
169 -
 170
170 -
 171
171 -
 172
172 -
 173
173 -
 174
174 -
 175
175 -
 176
176 -
 177
177 -
 178
178 -
 179
179 -
180
-
181
-
182
-
183
-
184
-
185
-
186
-
187
-
188
-
189
-
190
-
191
-
192
-
193
-
194
-
195
-
196
-
197
-
198
-
199
-
200
-
201
-
202
-
203
-
204
-
205
-
206
-
207
-
208
-
209
-
210
-
211
-
212
-
213
-
214
-
215
-
216
-
217
-
218
-
219
-
220
-
221
-
222
-
223
-
224
-
225
-
226
-
227
-
228
-
229
-
230
-
231
-
232
-
233
-
234
-
235
-
236
-
237
-
238
-
239
-
240
-
241
-
242
-
243
-
244
-
245
-
246
-
247
-
248
-
249
-
250
-
251
-
252
-
253
-
254
-
255
-
256
-
257
-
258
-
259
-
260
-
261
-
262
-
263
-
264
-
265
-
266
-
267
-
268
-
269
-
270
-
271
-
272
-
273
 |
 |
