Lenovo ThinkPad T420 (English) User Guide - Page 206
Active for Security Chip, BIOS ROM String
 |
View all Lenovo ThinkPad T420 manuals
Add to My Manuals
Save this manual to your list of manuals |
Page 206 highlights
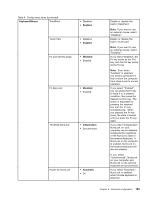
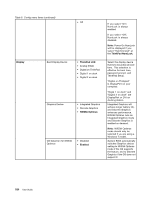
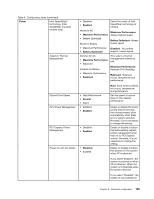
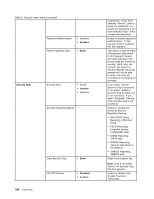
Table 9. Security menu items (continued) Password Authentication • Disabled • Enabled Reset Fingerprint Data • Enter Security Chip Security Chip • Active • Inactive • Disabled Security Reporting Options 188 User Guide Clear Security Chip • Enter Intel TXT Feature • Disabled • Enabled a password. If you have selected "Normal", enter a power-on password or a supervisor password; if you have selected "High", enter a supervisor password. Enable or disable password authentication. If high security mode is selected, this item appears. This option is used to erase all fingerprint data stored in the fingerprint reader and reset settings to the factory state (ex. Power-on security, LEDs, etc.) As a result, any power-on security features previously enabled will not be able to work until they are re-enabled in the fingerprint software. If you select "Active", Security Chip is functional. If you select "Inactive", Security Chip is visible, but is not functional. If you select "Disabled", Security Chip is hidden and is not functional. Enable or disable the following Security Reporting Options. • BIOS ROM String Reporting: BIOS text string • ESCD Reporting: Extended system configuration data • CMOS Reporting: CMOS data • NVRAM Reporting: Security data stored in the Asset ID • SMBIOS Reporting: SMBIOS data Clear the encryption key. Note: Only if you select "Active" for Security Chip, this item appears. Enable or disable Intel Trusted Execution Technology.
-
 1
1 -
2
-
3
-
4
-
5
-
6
-
7
-
8
-
9
-
10
-
11
-
12
-
13
-
14
-
15
-
16
-
17
-
18
-
19
-
20
-
21
-
22
-
23
-
24
-
25
-
26
-
27
-
28
-
29
-
30
-
31
-
32
-
33
-
34
-
35
-
36
-
37
-
38
-
39
-
40
-
41
-
42
-
43
-
44
-
45
-
46
-
47
-
48
-
49
-
50
-
51
-
52
-
53
-
54
-
55
-
56
-
57
-
58
-
59
-
60
-
61
-
62
-
63
-
64
-
65
-
66
-
67
-
68
-
69
-
70
-
71
-
72
-
73
-
74
-
75
-
76
-
77
-
78
-
79
-
80
-
81
-
82
-
83
-
84
-
85
-
86
-
87
-
88
-
89
-
90
-
91
-
92
-
93
-
94
-
95
-
96
-
97
-
98
-
99
-
100
-
101
-
102
-
103
-
104
-
105
-
106
-
107
-
108
-
109
-
110
-
111
-
112
-
113
-
114
-
115
-
116
-
117
-
118
-
119
-
120
-
121
-
122
-
123
-
124
-
125
-
126
-
127
-
128
-
129
-
130
-
131
-
132
-
133
-
134
-
135
-
136
-
137
-
138
-
139
-
140
-
141
-
142
-
143
-
144
-
145
-
146
-
147
-
148
-
149
-
150
-
151
-
152
-
153
-
154
-
155
-
156
-
157
-
158
-
159
-
160
-
161
-
162
-
163
-
164
-
165
-
166
-
167
-
168
-
169
-
170
-
171
-
172
-
173
-
174
-
175
-
176
-
177
-
178
-
179
-
180
-
181
-
182
-
183
-
184
-
185
-
186
-
187
-
188
-
189
-
190
-
191
-
192
-
193
-
194
-
195
-
196
-
197
-
198
-
199
-
200
-
 201
201 -
 202
202 -
 203
203 -
 204
204 -
 205
205 -
 206
206 -
 207
207 -
 208
208 -
 209
209 -
 210
210 -
 211
211 -
212
-
213
-
214
-
215
-
216
-
217
-
218
-
219
-
220
-
221
-
222
-
223
-
224
-
225
-
226
-
227
-
228
-
229
-
230
-
231
-
232
-
233
-
234
-
235
-
236
-
237
-
238
-
239
-
240
-
241
-
242
-
243
-
244
-
245
-
246
-
247
-
248
-
249
-
250
-
251
-
252
-
253
-
254
-
255
-
256
-
257
-
258
-
259
-
260
-
261
-
262
-
263
-
264
-
265
-
266
-
267
-
268
-
269
-
270
-
271
-
272
-
273
 |
 |