Lenovo ThinkPad T540p (English) System Update 3.14 Deployment Guide - Page 41
System Update version control using Active Directory, Configuring System Update with start.reg
 |
View all Lenovo ThinkPad T540p manuals
Add to My Manuals
Save this manual to your list of manuals |
Page 41 highlights
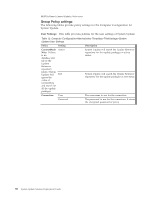
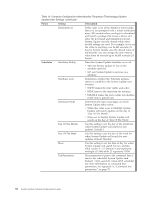
Setting policies for multiple repositories: Use the following example to set the policies in Group Policy when using multiple repositories: 1. After adding the Administrative Template for System Update, navigate Group Policy Object Editor to the following location: Computer Configuration\Administrative Templates\ThinkVantage \System Update\User Settings\General\Repository Location 2. Double-click Repository Location. 3. In the Local Repository 2 field, type the file path for your local system repository, for example: %ANYDRV%\SystemUpdate3_x\ 4. In the Local Repository 3 field, type the network share repository path of your server and share, for example: \\Server_X\TVSU_repository\ 5. Click Apply. System Update version control using Active Directory If you want to control the version of System Update available to your users, you can use your network repository to store specific versions of System Update. Storing packages locally will enable the System Update application to search for upgrades within your network repository. To configure Active Directory for System Update version control, complete the following steps: 1. Download SSClientCommon.zip from the following Lenovo Web site: http://www.lenovo.com/support/site.wss/document.do?lndocid=TVAN-ADMIN#tvsu 2. Extract the SSClientCommon.zip file to your repository folder. 3. After adding the Administrative Template for System Update, navigate the Group Policy Object Editor to the following location: Computer Configuration\Administrative Templates\ThinkVantage \System Update\UCSettings\HTTPSHelloSettings 4. Double-click Update Thyself. 5. Click Enabled. 6. In the Update Thyself text box, type the UNC path of your repository. For example: \\Server_X\TVSU_repository\ Note: If your repository folder requires authentication, set the polices for the Mapped Network Drive. For information about Mapped Network Drive policies, see "Group Policy settings" on page 30. 7. Click OK. 8. Deploy these settings to client systems. Note: System Update version control is compatible with System Update 3.02 and future releases. Configuring System Update with start.reg Configurable items will initially be set when System Update starts. The start.reg file is used to update the Windows registry and is located in the folder where System Update was installed. The registry fields are initially set based on the contents of the start.reg file. The installed start.reg file has the default configuration used by System Update. Chapter 3. Configurations 35
-
 1
1 -
2
-
3
-
4
-
5
-
6
-
7
-
8
-
9
-
10
-
11
-
12
-
13
-
14
-
15
-
16
-
17
-
18
-
19
-
20
-
21
-
22
-
23
-
24
-
25
-
26
-
27
-
28
-
29
-
30
-
31
-
32
-
33
-
34
-
35
-
 36
36 -
 37
37 -
 38
38 -
 39
39 -
 40
40 -
 41
41 -
 42
42 -
 43
43 -
 44
44 -
 45
45 -
 46
46 -
47
-
48
-
49
-
50
-
51
-
52
-
53
-
54
-
55
-
56
-
57
-
58
-
59
-
60
-
61
-
62
-
63
-
64
-
65
-
66
-
67
-
68
-
69
-
70
-
71
-
72
-
73
-
74
-
75
-
76
-
77
-
78
-
79
-
80
-
81
-
82
-
83
-
84
-
85
-
86
-
87
-
88
-
89
-
90
-
91
-
92
 |
 |
