Lenovo ThinkPad i Series 1300 ThinkPad 130, 1200, 1300 - Hardware Maintenance - Page 43
To create a recovery repair diskette
 |
View all Lenovo ThinkPad i Series 1300 manuals
Add to My Manuals
Save this manual to your list of manuals |
Page 43 highlights
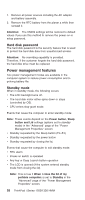
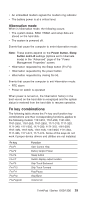
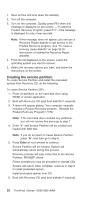
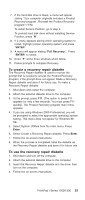
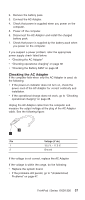
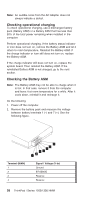
7. If the hard disk drive is blank, a menu will appear stating ″Your computer originally included a Product Recovery program...Reinstall the Product Recovery program? (Y/N) To install Service Partition, go to step 4. To preload hard disk drive without installing Service Partition, press ″N″. 8. If a menu appears asking which operating system to install, highlight proper operating system and press ″ENTER″. 9. A menu will appear stating ″Full Recovery:″. Press ″ENTER″ to select. 10. Enter ″Y″ at the three windows which follow. 11. Follow prompts to complete Recovery. To create a recovery repair diskette The Recovery Repair diskette is used to recover the prompt that is needed to access the Product Recovery program, if the prompt does not appear. Make a Recovery Repair diskette and save it for future use. To make a Recovery Repair diskette: 1. Shut down and restart the computer. 2. Attach the external diskette drive to the computer. 3. At the prompt, press F11. (The option to press F11 appears for only a few seconds. You must press F11 quickly). The Product Recovery program main menu appears. 4. If you are using Windows 2000 Professional, you will be prompted to select the appropriate operating system setting. This menu does not appear for Windows 98 SE. 5. Select System Utilities from the main menu. Press Enter. 6. Select Create a Recovery Repair diskette. Press Enter. 7. Follow the on-screen instructions. 8. When the process is completed, label the diskette as the Recovery Repair diskette and save it for future use. To use the recovery repair diskette 1. Shut down and turn off the computer. 2. Attach the external diskette drive to the computer. 3. Insert the Recovery Repair diskette into the drive; then turn on the computer. 4. Follow the on-screen instructions. ThinkPad i Series 1200/1300 33
-
 1
1 -
2
-
3
-
4
-
5
-
6
-
7
-
8
-
9
-
10
-
11
-
12
-
13
-
14
-
15
-
16
-
17
-
18
-
19
-
20
-
21
-
22
-
23
-
24
-
25
-
26
-
27
-
28
-
29
-
30
-
31
-
32
-
33
-
34
-
35
-
36
-
37
-
 38
38 -
 39
39 -
 40
40 -
 41
41 -
 42
42 -
 43
43 -
 44
44 -
 45
45 -
 46
46 -
 47
47 -
 48
48 -
49
-
50
-
51
-
52
-
53
-
54
-
55
-
56
-
57
-
58
-
59
-
60
-
61
-
62
-
63
-
64
-
65
-
66
-
67
-
68
-
69
-
70
-
71
-
72
-
73
-
74
-
75
-
76
-
77
-
78
-
79
-
80
-
81
-
82
-
83
-
84
-
85
-
86
-
87
-
88
-
89
-
90
-
91
-
92
-
93
-
94
-
95
-
96
-
97
-
98
-
99
-
100
-
101
-
102
-
103
-
104
-
105
-
106
-
107
-
108
-
109
-
110
-
111
-
112
-
113
-
114
-
115
-
116
-
117
-
118
-
119
-
120
-
121
-
122
-
123
-
124
-
125
-
126
-
127
-
128
-
129
-
130
-
131
-
132
-
133
-
134
-
135
-
136
-
137
-
138
-
139
-
140
-
141
-
142
-
143
-
144
-
145
-
146
-
147
-
148
-
149
-
150
-
151
-
152
-
153
-
154
-
155
-
156
-
157
-
158
-
159
-
160
-
161
-
162
-
163
-
164
-
165
-
166
-
167
-
168
-
169
-
170
-
171
-
172
-
173
-
174
-
175
-
176
-
177
-
178
-
179
-
180
-
181
-
182
-
183
-
184
-
185
-
186
-
187
-
188
-
189
-
190
-
191
-
192
-
193
-
194
-
195
-
196
-
197
-
198
-
199
-
200
-
201
-
202
-
203
-
204
-
205
-
206
-
207
-
208
-
209
-
210
-
211
-
212
-
213
-
214
-
215
-
216
-
217
-
218
-
219
-
220
-
221
-
222
-
223
-
224
-
225
-
226
-
227
-
228
-
229
-
230
-
231
-
232
-
233
 |
 |
