Lexmark 736dn User's Guide - Page 165
Replacing a toner cartridge, Replace Supply
 |
UPC - 734646086097
View all Lexmark 736dn manuals
Add to My Manuals
Save this manual to your list of manuals |
Page 165 highlights
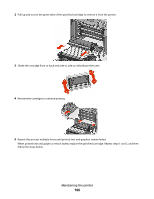
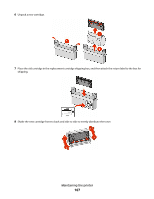
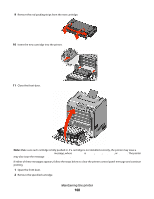
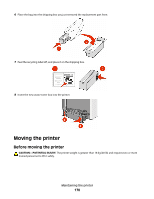
If you see Ready on the printer display screen after you have replaced a photoconductor, follow Steps 1 through 7 below. 1 To specify the replaced photoconductor, press . Supplies Menu appears. 2 Press . Replace Supply appears. 3 Press . 4 Press the down arrow button until All, Cyan photoconductor, Magenta photoconductor, Yellow photoconductor, or Black photoconductor appears, depending on the photoconductor you just replaced. 5 Press . photoconductor replaced appears. Yes appears. 6 Press . 7 Press until Ready appears. The task is complete. Replacing a toner cartridge When 88 Replace cartridge, 88 cartridge nearly low, or 88 cartridge low appears on the printer control panel, or when print becomes faded, try to extend the life of the specified cartridge. 1 Open the front door. Warning-Potential Damage: Make sure the printer is not open for 10 minutes or more to avoid overexposing the photoconductor units to light. Maintaining the printer 165
-
 1
1 -
2
-
3
-
4
-
5
-
6
-
7
-
8
-
9
-
10
-
11
-
12
-
13
-
14
-
15
-
16
-
17
-
18
-
19
-
20
-
21
-
22
-
23
-
24
-
25
-
26
-
27
-
28
-
29
-
30
-
31
-
32
-
33
-
34
-
35
-
36
-
37
-
38
-
39
-
40
-
41
-
42
-
43
-
44
-
45
-
46
-
47
-
48
-
49
-
50
-
51
-
52
-
53
-
54
-
55
-
56
-
57
-
58
-
59
-
60
-
61
-
62
-
63
-
64
-
65
-
66
-
67
-
68
-
69
-
70
-
71
-
72
-
73
-
74
-
75
-
76
-
77
-
78
-
79
-
80
-
81
-
82
-
83
-
84
-
85
-
86
-
87
-
88
-
89
-
90
-
91
-
92
-
93
-
94
-
95
-
96
-
97
-
98
-
99
-
100
-
101
-
102
-
103
-
104
-
105
-
106
-
107
-
108
-
109
-
110
-
111
-
112
-
113
-
114
-
115
-
116
-
117
-
118
-
119
-
120
-
121
-
122
-
123
-
124
-
125
-
126
-
127
-
128
-
129
-
130
-
131
-
132
-
133
-
134
-
135
-
136
-
137
-
138
-
139
-
140
-
141
-
142
-
143
-
144
-
145
-
146
-
147
-
148
-
149
-
150
-
151
-
152
-
153
-
154
-
155
-
156
-
157
-
158
-
159
-
 160
160 -
 161
161 -
 162
162 -
 163
163 -
 164
164 -
 165
165 -
 166
166 -
 167
167 -
 168
168 -
 169
169 -
 170
170 -
171
-
172
-
173
-
174
-
175
-
176
-
177
-
178
-
179
-
180
-
181
-
182
-
183
-
184
-
185
-
186
-
187
-
188
-
189
-
190
-
191
-
192
-
193
-
194
-
195
-
196
-
197
-
198
-
199
-
200
-
201
-
202
-
203
-
204
-
205
-
206
-
207
-
208
-
209
-
210
-
211
-
212
-
213
-
214
-
215
-
216
-
217
 |
 |
