Lexmark 736dn User's Guide - Page 73
Printing confidential and other held jobs, Held jobs, Try again, Cancel
 |
UPC - 734646086097
View all Lexmark 736dn manuals
Add to My Manuals
Save this manual to your list of manuals |
Page 73 highlights
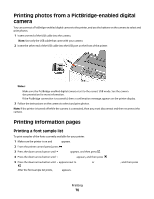
Job type Confidential Verify Reserve Repeat Description When you send a Confidential print job to the printer, you must create a PIN in Print Properties. The PIN must be four digits using the numbers 0-9. The job is held in printer memory until you enter the PIN from the printer control panel and choose to print or delete the job. When you send a Verify print job, the printer prints one copy and holds the remaining copies in printer memory. Verify lets you examine the first copy to see if it is satisfactory before printing the remaining copies. Once all copies are printed, the job is automatically deleted from printer memory. When you send a Reserve print job, the printer does not print the job immediately. It stores the job in memory so you can print the job later. The job is held in memory until you delete it from the Held Jobs menu. When you send a Repeat print job, the printer prints all requested copies of the job and stores the job in memory so you can print additional copies later. You can print additional copies as long as the job remains stored in memory. Printing confidential and other held jobs Confidential and Verify print jobs are automatically deleted from memory after they print. Repeat and Reserve jobs continue to be held in the printer until you choose to delete them. For Windows Users 1 With a document open, click File ª Print. 2 Click Properties, Preferences, Options, or Setup. 3 Click Other Options, and then click Print and Hold. 4 Select your job type (Confidential, Reserve, Repeat, or Verify), and then assign a user name. For a confidential job, also enter a four-digit PIN. 5 Click OK or Print, and then go to the printer to release the job. 6 From the printer control panel, press the down arrow button until Held jobs appears, and then press . 7 Press the down arrow button until appears next to your user name, and then press . 8 Press the down arrow button until appears next to the job type or job name, and then press . If you selected a job name, proceed to step 11 on page 73. 9 After selecting your job type, use the keypad to enter your PIN. If you enter an invalid PIN, the Invalid PIN screen appears. • To re-enter the PIN, make sure Try again appears, and then press . • To cancel the PIN, press the down arrow button until Cancel appears, and then press . 10 Press the down arrow button until appears next to the job you want to print, and then press . 11 Press the down arrow button until appears next to the number of copies you want to print, and then press . Note: Use the keypad to enter a number if necessary. Printing 73
-
 1
1 -
2
-
3
-
4
-
5
-
6
-
7
-
8
-
9
-
10
-
11
-
12
-
13
-
14
-
15
-
16
-
17
-
18
-
19
-
20
-
21
-
22
-
23
-
24
-
25
-
26
-
27
-
28
-
29
-
30
-
31
-
32
-
33
-
34
-
35
-
36
-
37
-
38
-
39
-
40
-
41
-
42
-
43
-
44
-
45
-
46
-
47
-
48
-
49
-
50
-
51
-
52
-
53
-
54
-
55
-
56
-
57
-
58
-
59
-
60
-
61
-
62
-
63
-
64
-
65
-
66
-
67
-
 68
68 -
 69
69 -
 70
70 -
 71
71 -
 72
72 -
 73
73 -
 74
74 -
 75
75 -
 76
76 -
 77
77 -
 78
78 -
79
-
80
-
81
-
82
-
83
-
84
-
85
-
86
-
87
-
88
-
89
-
90
-
91
-
92
-
93
-
94
-
95
-
96
-
97
-
98
-
99
-
100
-
101
-
102
-
103
-
104
-
105
-
106
-
107
-
108
-
109
-
110
-
111
-
112
-
113
-
114
-
115
-
116
-
117
-
118
-
119
-
120
-
121
-
122
-
123
-
124
-
125
-
126
-
127
-
128
-
129
-
130
-
131
-
132
-
133
-
134
-
135
-
136
-
137
-
138
-
139
-
140
-
141
-
142
-
143
-
144
-
145
-
146
-
147
-
148
-
149
-
150
-
151
-
152
-
153
-
154
-
155
-
156
-
157
-
158
-
159
-
160
-
161
-
162
-
163
-
164
-
165
-
166
-
167
-
168
-
169
-
170
-
171
-
172
-
173
-
174
-
175
-
176
-
177
-
178
-
179
-
180
-
181
-
182
-
183
-
184
-
185
-
186
-
187
-
188
-
189
-
190
-
191
-
192
-
193
-
194
-
195
-
196
-
197
-
198
-
199
-
200
-
201
-
202
-
203
-
204
-
205
-
206
-
207
-
208
-
209
-
210
-
211
-
212
-
213
-
214
-
215
-
216
-
217
 |
 |
