Lexmark E450DN Service Manual - Page 111
Reinstallation note, for the final few millimeters.
 |
View all Lexmark E450DN manuals
Add to My Manuals
Save this manual to your list of manuals |
Page 111 highlights
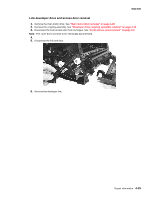
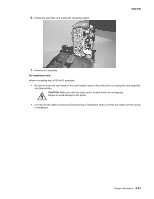
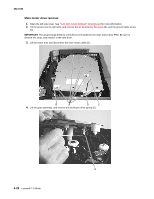
11. Unlatch the fuser (see (A) and (B) in the second photo below), and remove. 4512-630 Reinstallation note: • Be sure to reroute the cables back through their retainers. • If the printer has been moved following the removal of the fuser, verify that the cross shaft behind the fuser is in place. • Place the fuser into the opening, and push levers (A) to open the latches (B). Push the fuser into the final position on the release levers. Alternatively, the fuser may be tilted to drop the latches (B) below the shaft for the final few millimeters. • Check to make sure that the ground cable is routed out of the way and will not be pinched or damaged by the rear cover. Repair information 4-23
-
 1
1 -
2
-
3
-
4
-
5
-
6
-
7
-
8
-
9
-
10
-
11
-
12
-
13
-
14
-
15
-
16
-
17
-
18
-
19
-
20
-
21
-
22
-
23
-
24
-
25
-
26
-
27
-
28
-
29
-
30
-
31
-
32
-
33
-
34
-
35
-
36
-
37
-
38
-
39
-
40
-
41
-
42
-
43
-
44
-
45
-
46
-
47
-
48
-
49
-
50
-
51
-
52
-
53
-
54
-
55
-
56
-
57
-
58
-
59
-
60
-
61
-
62
-
63
-
64
-
65
-
66
-
67
-
68
-
69
-
70
-
71
-
72
-
73
-
74
-
75
-
76
-
77
-
78
-
79
-
80
-
81
-
82
-
83
-
84
-
85
-
86
-
87
-
88
-
89
-
90
-
91
-
92
-
93
-
94
-
95
-
96
-
97
-
98
-
99
-
100
-
101
-
102
-
103
-
104
-
105
-
 106
106 -
 107
107 -
 108
108 -
 109
109 -
 110
110 -
 111
111 -
 112
112 -
 113
113 -
 114
114 -
 115
115 -
 116
116 -
117
-
118
-
119
-
120
-
121
-
122
-
123
-
124
-
125
-
126
-
127
-
128
-
129
-
130
-
131
-
132
-
133
-
134
-
135
-
136
-
137
-
138
-
139
-
140
-
141
-
142
-
143
-
144
-
145
-
146
-
147
-
148
-
149
-
150
-
151
-
152
-
153
-
154
-
155
-
156
-
157
-
158
 |
 |

Repair information
4-23
4512-630
11.
Unlatch the fuser (see (A) and (B) in the second photo below), and remove.
Reinstallation note:
•
Be sure to reroute the cables back through their retainers.
•
If the printer has been moved following the removal of the fuser, verify that the cross shaft behind the fuser
is in place.
•
Place the fuser into the opening, and push levers (A) to open the latches (B). Push the fuser into the final
position on the release levers. Alternatively, the fuser may be tilted to drop the latches (B) below the shaft
for the final few millimeters.
•
Check to make sure that the ground cable is routed out of the way and will not be pinched or damaged by
the rear cover.