Lexmark E450DN Service Manual - Page 124
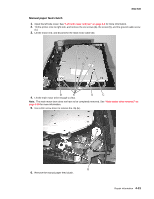
Operator panel removal, Bezel removal
 |
View all Lexmark E450DN manuals
Add to My Manuals
Save this manual to your list of manuals |
Page 124 highlights
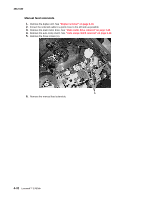
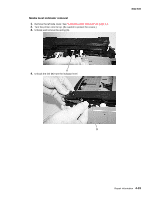
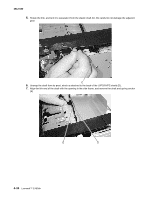
4512-630 Operator panel removal 1. Open the front cover. 2. Remove the bezel. See "Bezel removal" on page 3-12. 3. Remove the screw (A). 4. Remove the face plate which surrounds the bezel by unlatching the four tabs (B). 5. Close the front cover. 6. Disconnect the cable (C). (The LED operator panel connects the same as the LCD panel as shown.) 7. Unlatch the four latches on the panel cover. 8. Pull the bottom edge out until it slides in a downward motion out of its retainers. 9. Slide the card out from the latches on top. 10. Remove the operator panel. Warning: Do not replace the operator panel and the controller card at the same time. Each card contains the printer settings. When either of these cards is new, it obtains its settings from the other card. Critical factory settings are lost when both are new and replaced at the same time. 4-36 Lexmark™ E450dn
-
 1
1 -
2
-
3
-
4
-
5
-
6
-
7
-
8
-
9
-
10
-
11
-
12
-
13
-
14
-
15
-
16
-
17
-
18
-
19
-
20
-
21
-
22
-
23
-
24
-
25
-
26
-
27
-
28
-
29
-
30
-
31
-
32
-
33
-
34
-
35
-
36
-
37
-
38
-
39
-
40
-
41
-
42
-
43
-
44
-
45
-
46
-
47
-
48
-
49
-
50
-
51
-
52
-
53
-
54
-
55
-
56
-
57
-
58
-
59
-
60
-
61
-
62
-
63
-
64
-
65
-
66
-
67
-
68
-
69
-
70
-
71
-
72
-
73
-
74
-
75
-
76
-
77
-
78
-
79
-
80
-
81
-
82
-
83
-
84
-
85
-
86
-
87
-
88
-
89
-
90
-
91
-
92
-
93
-
94
-
95
-
96
-
97
-
98
-
99
-
100
-
101
-
102
-
103
-
104
-
105
-
106
-
107
-
108
-
109
-
110
-
111
-
112
-
113
-
114
-
115
-
116
-
117
-
118
-
 119
119 -
 120
120 -
 121
121 -
 122
122 -
 123
123 -
 124
124 -
 125
125 -
 126
126 -
 127
127 -
 128
128 -
 129
129 -
130
-
131
-
132
-
133
-
134
-
135
-
136
-
137
-
138
-
139
-
140
-
141
-
142
-
143
-
144
-
145
-
146
-
147
-
148
-
149
-
150
-
151
-
152
-
153
-
154
-
155
-
156
-
157
-
158
 |
 |
