Lexmark Forms Printer 2590n Lexmark Forms Printer 2500+ Series User's Guide - Page 26
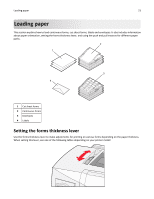
Loading continuous paper, Loading continuous forms using the push tractor
 |
View all Lexmark Forms Printer 2590n manuals
Add to My Manuals
Save this manual to your list of manuals |
Page 26 highlights
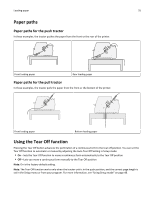
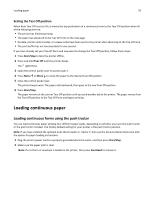
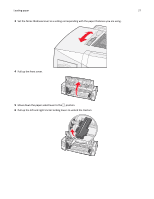
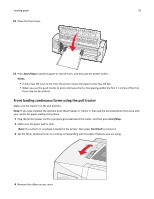
Loading paper 26 Setting the Tear Off position When Auto Tear Off is set to On, it moves the top perforation of a continuous form to the Tear Off position when all of the following are true: • The printer has finished printing. • The paper has advanced to the Top‑Of‑Form on the next page. • No data, printer control codes, or escape codes have been sent to the printer after advancing to the Top‑Of‑Form. • The print buffer has not received data for one second. If you have already set your Top‑Of‑Form and now want to change the Tear Off position, follow these steps: 1 Press Start/Stop to take the printer offline. 2 Press and hold Tear Off until the printer beeps. The light blinks. 3 Open the control panel cover to access layer 2. 4 Press Micro or Micro to move the paper to the desired Tear Off position. 5 Close the control panel cover. The printer beeps twice. The paper rolls backward, then goes to the new Tear Off position. 6 Press Start/Stop. The paper remains at the current Tear Off position until you send another job to the printer. The paper moves from the Tear Off position to the Top‑Of‑Form and begins printing. Loading continuous paper Loading continuous forms using the push tractor You can load continuous paper utilizing four different paper paths, depending on whether you have the push tractor or the pull tractor installed. The factory default setting for your printer is the push tractor position. Note: If you have installed the optional Auto Sheet Feeder or Tractor 2, then see the documentation that came with the option for paper loading instructions. 1 Plug the printer power cord to a properly grounded electrical outlet, and then press Start/Stop. 2 Make sure the paper path is clear. Note: If a cut form or envelope is loaded in the printer, then press FormFeed to remove it.
-
 1
1 -
2
-
3
-
4
-
5
-
6
-
7
-
8
-
9
-
10
-
11
-
12
-
13
-
14
-
15
-
16
-
17
-
18
-
19
-
20
-
 21
21 -
 22
22 -
 23
23 -
 24
24 -
 25
25 -
 26
26 -
 27
27 -
 28
28 -
 29
29 -
 30
30 -
 31
31 -
32
-
33
-
34
-
35
-
36
-
37
-
38
-
39
-
40
-
41
-
42
-
43
-
44
-
45
-
46
-
47
-
48
-
49
-
50
-
51
-
52
-
53
-
54
-
55
-
56
-
57
-
58
-
59
-
60
-
61
-
62
-
63
-
64
-
65
-
66
-
67
-
68
-
69
-
70
-
71
-
72
-
73
-
74
-
75
-
76
-
77
-
78
-
79
-
80
-
81
-
82
-
83
-
84
-
85
 |
 |