Lexmark Forms Printer 2590n Lexmark Forms Printer 2500+ Series User's Guide - Page 63
Checking the printer status, Using Hex Trace mode
 |
View all Lexmark Forms Printer 2590n manuals
Add to My Manuals
Save this manual to your list of manuals |
Page 63 highlights
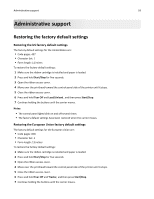
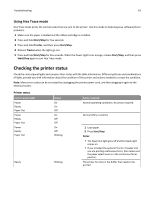
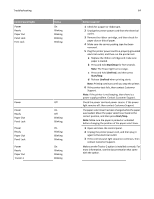
Troubleshooting 63 Using Hex Trace mode Hex Trace mode prints the control codes that are sent to the printer. Use this mode to help diagnose software/driver problems. 1 Make sure the paper is loaded and the ribbon cartridge is installed. 2 Press and hold Start/Stop for five seconds. 3 Press and hold Tractor, and then press Start/Stop. 4 Release Tractor when the lights go out. 5 Press and hold Start/Stop for five seconds. When the Power light turns orange, release Start/Stop, and then press Start/Stop again to exit Hex Trace mode. Checking the printer status Check the control panel lights and compare their status with the table information. Different patterns and combinations of lights provide you with information about the condition of the printer and actions needed to correct the condition. Note: Many error codes can be corrected by unplugging the printer power cord, and then plugging it again to the electrical outlet. Printer status Control panel lights Power Ready Paper Out Power Ready Paper Out Power Ready Paper Out Status On On Off On Off Off On Off Blinking Ready Blinking Action required Normal operating conditions. No action required. Normal offline condition 1 Load paper. 2 Press Start/Stop. Notes: • The Paper Out light goes off and the Ready light comes on. • If you installed the optional Tractor 2 Feeder and you are printing continuous forms, then make sure the paper select lever is in the continuous forms position. The printer has data in the buffer that needs to be printed.
-
 1
1 -
2
-
3
-
4
-
5
-
6
-
7
-
8
-
9
-
10
-
11
-
12
-
13
-
14
-
15
-
16
-
17
-
18
-
19
-
20
-
21
-
22
-
23
-
24
-
25
-
26
-
27
-
28
-
29
-
30
-
31
-
32
-
33
-
34
-
35
-
36
-
37
-
38
-
39
-
40
-
41
-
42
-
43
-
44
-
45
-
46
-
47
-
48
-
49
-
50
-
51
-
52
-
53
-
54
-
55
-
56
-
57
-
 58
58 -
 59
59 -
 60
60 -
 61
61 -
 62
62 -
 63
63 -
 64
64 -
 65
65 -
 66
66 -
 67
67 -
 68
68 -
69
-
70
-
71
-
72
-
73
-
74
-
75
-
76
-
77
-
78
-
79
-
80
-
81
-
82
-
83
-
84
-
85
 |
 |