Lexmark MB2236 Embedded Web Server Administrator s Guide - Page 60
Cannot send fax to one destination
 |
View all Lexmark MB2236 manuals
Add to My Manuals
Save this manual to your list of manuals |
Page 60 highlights
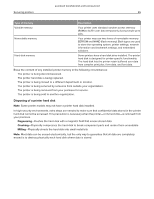
Lexmark Confidential until announced Troubleshooting 60 3 Click Save. If using a distinctive ring service, then confirm that the printer is configured properly to pick up the correct ring pattern 1 From the Embedded Web Server, click Settings > Fax > Fax Setup. 2 From the Fax Receive Settings menu, click Admin Controls, and then select the Answer On setting that matches the phone number intended for faxes. 3 Click Save. Reduce the Max Receive speed 1 From the Embedded Web Server, click Settings > Fax > Fax Setup. 2 From the Fax Receive Settings menu, click Admin Controls, and then reduce the Max Speed. 3 Click Save. Check the fax forwarding setting Note: This feature is available only in some printer models. 1 From the Embedded Web Server, click Settings > Fax > Fax Setup. 2 From the Fax Receive Settings menu, click Admin Controls, and then select any setting for Fax Forwarding except Forward. 3 Click Save. Make sure that no other phone number is competing with the printer 1 From the Embedded Web Server, click Settings > Fax > Fax Setup. 2 From the Fax Receive Settings menu, change the "Rings to Answer" value. 3 Click Save. Generate fax logs and identify the status message From the Embedded Web Server, click Reports > Fax > Fax Job Log. Cannot send fax to one destination Try one or more of the following: Make sure that you entered the correct fax number Reduce the maximum send speed 1 From the Embedded Web Server, click Settings > Fax > Fax Setup. 2 From the Fax Send Settings menu, click Admin Controls > Max Speed, and then select a lower setting. 3 Click Submit.
-
 1
1 -
2
-
3
-
4
-
5
-
6
-
7
-
8
-
9
-
10
-
11
-
12
-
13
-
14
-
15
-
16
-
17
-
18
-
19
-
20
-
21
-
22
-
23
-
24
-
25
-
26
-
27
-
28
-
29
-
30
-
31
-
32
-
33
-
34
-
35
-
36
-
37
-
38
-
39
-
40
-
41
-
42
-
43
-
44
-
45
-
46
-
47
-
48
-
49
-
50
-
51
-
52
-
53
-
54
-
 55
55 -
 56
56 -
 57
57 -
 58
58 -
 59
59 -
 60
60 -
 61
61 -
 62
62 -
 63
63 -
 64
64 -
 65
65 -
66
-
67
-
68
-
69
-
70
-
71
 |
 |