Lexmark X502n Service Manual - Page 141
Repair information, Removal and cleaning precautions
 |
View all Lexmark X502n manuals
Add to My Manuals
Save this manual to your list of manuals |
Page 141 highlights
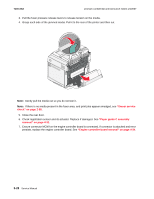
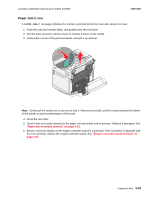
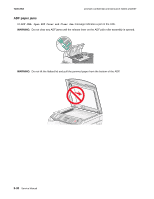
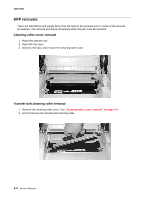
4. Repair information 7100-XXX Removal and cleaning precautions Observe the following precautions whenever you service the MFP: • Prior to starting any repair, read and understand the warnings in this manual. • Be sure to unplug the MFP from the outlet before attempting to service the MFP. • To reassemble the MFP, reverse the order of removal unless otherwise specified. • Do not operate the MFP anytime during removals. If it is absolutely necessary to run the MFP with its covers removed, use care not to allow your clothing to be caught in revolving parts such as the gears, rollers and fan motor. • Never touch the terminals of electrical parts or high-voltage parts such as the high voltage power supply. • Remove the ground wire when removing or replacing the low voltage power supply. After installation is complete, confirm the ground wire is reconnected to the earth mark . • After part replacement, ensure the wiring harness is not caught or damaged. • Do not attempt to cut or extend the wiring harness. • Confirm the wiring harness connector is connected properly. • Be sure to handle the fuser carefully, as it remains hot for a while after the MFP stops running. Always unplug connectors by holding the connector housing. • Remember to install the ground wire or ground plate to ensure a positive conduction. Install the screw with a toothed washer in the correct position at reassembly. • Never lift the MFP from the scanner assembly. • Confirm the direction of all parts and screw lengths during removal/replacement. • Any part where the mounting screws are used to meet a machine alignment set at the factory must not be removed, disassembled, or adjusted. For example, the paper pickup roll mounting bracket or internal parts not provided as replacement parts. • Utilize the proper cleaning procedures/solvents during maintenance. Repair information 4-1
-
 1
1 -
2
-
3
-
4
-
5
-
6
-
7
-
8
-
9
-
10
-
11
-
12
-
13
-
14
-
15
-
16
-
17
-
18
-
19
-
20
-
21
-
22
-
23
-
24
-
25
-
26
-
27
-
28
-
29
-
30
-
31
-
32
-
33
-
34
-
35
-
36
-
37
-
38
-
39
-
40
-
41
-
42
-
43
-
44
-
45
-
46
-
47
-
48
-
49
-
50
-
51
-
52
-
53
-
54
-
55
-
56
-
57
-
58
-
59
-
60
-
61
-
62
-
63
-
64
-
65
-
66
-
67
-
68
-
69
-
70
-
71
-
72
-
73
-
74
-
75
-
76
-
77
-
78
-
79
-
80
-
81
-
82
-
83
-
84
-
85
-
86
-
87
-
88
-
89
-
90
-
91
-
92
-
93
-
94
-
95
-
96
-
97
-
98
-
99
-
100
-
101
-
102
-
103
-
104
-
105
-
106
-
107
-
108
-
109
-
110
-
111
-
112
-
113
-
114
-
115
-
116
-
117
-
118
-
119
-
120
-
121
-
122
-
123
-
124
-
125
-
126
-
127
-
128
-
129
-
130
-
131
-
132
-
133
-
134
-
135
-
 136
136 -
 137
137 -
 138
138 -
 139
139 -
 140
140 -
 141
141 -
 142
142 -
 143
143 -
 144
144 -
 145
145 -
 146
146 -
147
-
148
-
149
-
150
-
151
-
152
-
153
-
154
-
155
-
156
-
157
-
158
-
159
-
160
-
161
-
162
-
163
-
164
-
165
-
166
-
167
-
168
-
169
-
170
-
171
-
172
-
173
-
174
-
175
-
176
-
177
-
178
-
179
-
180
-
181
-
182
-
183
-
184
-
185
-
186
-
187
-
188
-
189
-
190
-
191
-
192
-
193
-
194
-
195
-
196
-
197
-
198
-
199
-
200
-
201
-
202
-
203
-
204
-
205
-
206
-
207
-
208
-
209
-
210
-
211
-
212
-
213
-
214
-
215
-
216
-
217
-
218
-
219
-
220
-
221
-
222
-
223
-
224
-
225
-
226
-
227
-
228
-
229
-
230
-
231
-
232
-
233
-
234
-
235
-
236
-
237
-
238
-
239
-
240
-
241
-
242
-
243
-
244
 |
 |