Lexmark X502n Service Manual - Page 165
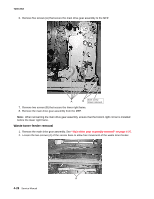
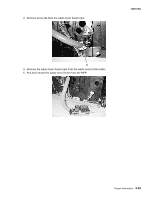
Cleaning roller clutch removal, Transfer belt cleaning roller removal
 |
View all Lexmark X502n manuals
Add to My Manuals
Save this manual to your list of manuals |
Page 165 highlights
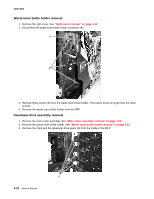
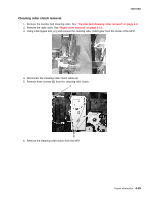
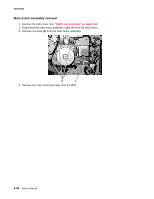
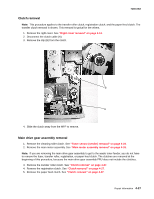
7100-XXX Cleaning roller clutch removal 1. Remove the transfer belt cleaning roller. See "Transfer belt cleaning roller removal" on page 4-4. 2. Remove the right cover. See "Right cover removal" on page 4-13. 3. Using a flat-tipped tool, pry and remove the cleaning roller clutch gear from the inside of the MFP. 4. Disconnect the cleaning roller clutch cable (A). 5. Remove three screws (B) from the cleaning roller clutch. A B 6. Remove the cleaning roller clutch from the MFP. Repair information 4-25
-
 1
1 -
2
-
3
-
4
-
5
-
6
-
7
-
8
-
9
-
10
-
11
-
12
-
13
-
14
-
15
-
16
-
17
-
18
-
19
-
20
-
21
-
22
-
23
-
24
-
25
-
26
-
27
-
28
-
29
-
30
-
31
-
32
-
33
-
34
-
35
-
36
-
37
-
38
-
39
-
40
-
41
-
42
-
43
-
44
-
45
-
46
-
47
-
48
-
49
-
50
-
51
-
52
-
53
-
54
-
55
-
56
-
57
-
58
-
59
-
60
-
61
-
62
-
63
-
64
-
65
-
66
-
67
-
68
-
69
-
70
-
71
-
72
-
73
-
74
-
75
-
76
-
77
-
78
-
79
-
80
-
81
-
82
-
83
-
84
-
85
-
86
-
87
-
88
-
89
-
90
-
91
-
92
-
93
-
94
-
95
-
96
-
97
-
98
-
99
-
100
-
101
-
102
-
103
-
104
-
105
-
106
-
107
-
108
-
109
-
110
-
111
-
112
-
113
-
114
-
115
-
116
-
117
-
118
-
119
-
120
-
121
-
122
-
123
-
124
-
125
-
126
-
127
-
128
-
129
-
130
-
131
-
132
-
133
-
134
-
135
-
136
-
137
-
138
-
139
-
140
-
141
-
142
-
143
-
144
-
145
-
146
-
147
-
148
-
149
-
150
-
151
-
152
-
153
-
154
-
155
-
156
-
157
-
158
-
159
-
 160
160 -
 161
161 -
 162
162 -
 163
163 -
 164
164 -
 165
165 -
 166
166 -
 167
167 -
 168
168 -
 169
169 -
 170
170 -
171
-
172
-
173
-
174
-
175
-
176
-
177
-
178
-
179
-
180
-
181
-
182
-
183
-
184
-
185
-
186
-
187
-
188
-
189
-
190
-
191
-
192
-
193
-
194
-
195
-
196
-
197
-
198
-
199
-
200
-
201
-
202
-
203
-
204
-
205
-
206
-
207
-
208
-
209
-
210
-
211
-
212
-
213
-
214
-
215
-
216
-
217
-
218
-
219
-
220
-
221
-
222
-
223
-
224
-
225
-
226
-
227
-
228
-
229
-
230
-
231
-
232
-
233
-
234
-
235
-
236
-
237
-
238
-
239
-
240
-
241
-
242
-
243
-
244
 |
 |

Repair information
4-25
7100-XXX
Cleaning roller clutch removal
1.
Remove the transfer belt cleaning roller. See
“Transfer belt cleaning roller removal” on page 4-4
.
2.
Remove the right cover. See
“Right cover removal” on page 4-13
.
3.
Using a flat-tipped tool, pry and remove the cleaning roller clutch gear from the inside of the MFP.
4.
Disconnect the cleaning roller clutch cable (A).
5.
Remove three screws (B) from the cleaning roller clutch.
6.
Remove the cleaning roller clutch from the MFP.
B
A