Lexmark X5320 User's Guide - Page 91
Understanding the Scan menu, Custom Settings, Scan Mode, Start Color, Start Black
 |
View all Lexmark X5320 manuals
Add to My Manuals
Save this manual to your list of manuals |
Page 91 highlights
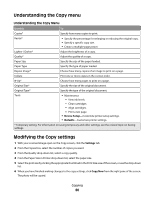
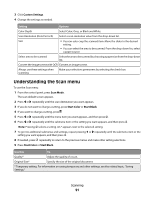
3 Click Custom Settings. 4 Change the settings as needed. Setting Options Color Depth Select Color, Grey, or Black and White. Scan Resolution (Dots Per Inch) Select a scan resolution value from the drop-down list. Size • You can auto-crop the scanned item. Move the slider to the desired setting. • You can select the area to be scanned. From the drop-down list, select a paper source. Select area to be scanned Select the area to be scanned by choosing a paper size from the drop-down list. Convert the image to text with OCR Convert an image to text. Always use these settings when Make your selections permanent by selecting the check box. scanning Understanding the Scan menu To use the Scan menu: 1 From the control panel, press Scan Mode. The scan default screen appears. 2 Press or repeatedly until the scan destination you want appears. 3 If you do not want to change a setting, press Start Color or Start Black. 4 If you want to change a setting, press . 5 Press or repeatedly until the menu item you want appears, and then press . 6 Press or repeatedly until the submenu item or the setting you want appears, and then press . Note: Pressing selects a setting. An * appears next to the selected setting. 7 To go into additional submenus and settings, repeat pressing or repeatedly until the submenu item or the setting you want appears, and then press . 8 If needed, press repeatedly to return to the previous menus and make other setting selections. 9 Press Start Color or Start Black. Use this To Quality* Adjust the quality of a scan. Original Size* Specify the size of the original document. * Temporary setting. For information on saving temporary and other settings, see the related topic, "Saving Settings." Scanning 91
-
 1
1 -
2
-
3
-
4
-
5
-
6
-
7
-
8
-
9
-
10
-
11
-
12
-
13
-
14
-
15
-
16
-
17
-
18
-
19
-
20
-
21
-
22
-
23
-
24
-
25
-
26
-
27
-
28
-
29
-
30
-
31
-
32
-
33
-
34
-
35
-
36
-
37
-
38
-
39
-
40
-
41
-
42
-
43
-
44
-
45
-
46
-
47
-
48
-
49
-
50
-
51
-
52
-
53
-
54
-
55
-
56
-
57
-
58
-
59
-
60
-
61
-
62
-
63
-
64
-
65
-
66
-
67
-
68
-
69
-
70
-
71
-
72
-
73
-
74
-
75
-
76
-
77
-
78
-
79
-
80
-
81
-
82
-
83
-
84
-
85
-
 86
86 -
 87
87 -
 88
88 -
 89
89 -
 90
90 -
 91
91 -
 92
92 -
 93
93 -
 94
94 -
 95
95 -
 96
96 -
97
-
98
-
99
-
100
-
101
-
102
-
103
-
104
-
105
-
106
-
107
-
108
-
109
-
110
-
111
-
112
-
113
-
114
-
115
-
116
-
117
-
118
-
119
-
120
-
121
-
122
-
123
-
124
-
125
-
126
-
127
-
128
-
129
-
130
-
131
-
132
-
133
-
134
-
135
-
136
-
137
-
138
-
139
-
140
-
141
-
142
-
143
-
144
-
145
-
146
-
147
-
148
-
149
-
150
-
151
-
152
-
153
-
154
-
155
-
156
-
157
-
158
-
159
-
160
-
161
-
162
-
163
-
164
-
165
-
166
-
167
-
168
-
169
-
170
-
171
-
172
-
173
-
174
-
175
-
176
-
177
-
178
-
179
-
180
-
181
-
182
-
183
-
184
-
185
-
186
-
187
-
188
-
189
-
190
-
191
-
192
-
193
-
194
 |
 |