Linksys QuickVPN Cisco WRVS4400N Wireless-N Gigabit Security Router with VPN A - Page 210
Distributing Certificates to QuickVPN Users, Using Cisco QuickVPN for Windows 2000, XP, or Vista
 |
UPC - 745883566341
View all Linksys QuickVPN manuals
Add to My Manuals
Save this manual to your list of manuals |
Page 210 highlights
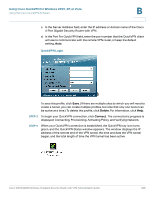
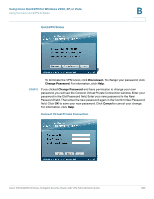
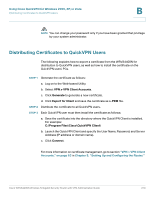
Using Cisco QuickVPN for Windows 2000, XP, or Vista Distributing Certificates to QuickVPN Users B NOTE You can change your password only if you have been granted that privilege by your system administrator. Distributing Certificates to QuickVPN Users The following explains how to export a certificate from the WRVS4400N for distribution to QuickVPN users, as well as how to install the certificate on the QuickVPN users' PCs. STEP 1 Generate the certificate as follows: a. Log on to the Web-based Utility. b. Select VPN > VPN Client Accounts. c. Click Generate to generate a new certificate. d. Click Export for Client and save the certificate as a .PEM file. STEP 2 Distribute the certificate to all QuickVPN users. STEP 3 Each QuickVPN user must then install the certificate as follows: a. Save the certificate into the directory where the QuickVPN Client is installed. For example: C:\Program Files\Cisco\QuickVPN Client\ b. Launch the QuickVPN Client and specify the User Name, Password, and Server Address (IP address or domain name). c. Click Connect. For more information on certificate management, go to section "VPN > VPN Client Accounts," on page 63 in Chapter 5, "Setting Up and Configuring the Router." Cisco WRVS4400N Wireless-N Gigabit Security Router with VPN Administration Guide 210
-
 1
1 -
2
-
3
-
4
-
5
-
6
-
7
-
8
-
9
-
10
-
11
-
12
-
13
-
14
-
15
-
16
-
17
-
18
-
19
-
20
-
21
-
22
-
23
-
24
-
25
-
26
-
27
-
28
-
29
-
30
-
31
-
32
-
33
-
34
-
35
-
36
-
37
-
38
-
39
-
40
-
41
-
42
-
43
-
44
-
45
-
46
-
47
-
48
-
49
-
50
-
51
-
52
-
53
-
54
-
55
-
56
-
57
-
58
-
59
-
60
-
61
-
62
-
63
-
64
-
65
-
66
-
67
-
68
-
69
-
70
-
71
-
72
-
73
-
74
-
75
-
76
-
77
-
78
-
79
-
80
-
81
-
82
-
83
-
84
-
85
-
86
-
87
-
88
-
89
-
90
-
91
-
92
-
93
-
94
-
95
-
96
-
97
-
98
-
99
-
100
-
101
-
102
-
103
-
104
-
105
-
106
-
107
-
108
-
109
-
110
-
111
-
112
-
113
-
114
-
115
-
116
-
117
-
118
-
119
-
120
-
121
-
122
-
123
-
124
-
125
-
126
-
127
-
128
-
129
-
130
-
131
-
132
-
133
-
134
-
135
-
136
-
137
-
138
-
139
-
140
-
141
-
142
-
143
-
144
-
145
-
146
-
147
-
148
-
149
-
150
-
151
-
152
-
153
-
154
-
155
-
156
-
157
-
158
-
159
-
160
-
161
-
162
-
163
-
164
-
165
-
166
-
167
-
168
-
169
-
170
-
171
-
172
-
173
-
174
-
175
-
176
-
177
-
178
-
179
-
180
-
181
-
182
-
183
-
184
-
185
-
186
-
187
-
188
-
189
-
190
-
191
-
192
-
193
-
194
-
195
-
196
-
197
-
198
-
199
-
200
-
201
-
202
-
203
-
204
-
 205
205 -
 206
206 -
 207
207 -
 208
208 -
 209
209 -
 210
210 -
 211
211 -
 212
212 -
 213
213 -
 214
214 -
 215
215 -
216
-
217
-
218
-
219
-
220
-
221
-
222
-
223
-
224
-
225
-
226
-
227
-
228
-
229
-
230
-
231
-
232
-
233
 |
 |
