Linksys WAP54G User Guide - Page 20
The Administration Tab > Management, Management - utility
 |
UPC - 745883553860
View all Linksys WAP54G manuals
Add to My Manuals
Save this manual to your list of manuals |
Page 20 highlights
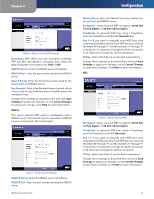
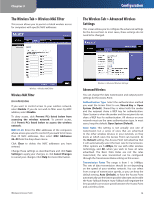
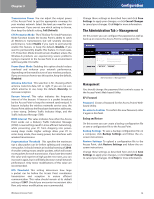
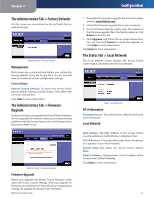
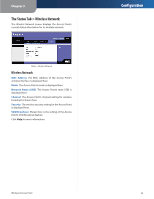
Chapter 3 Transmission Power You can adjust the output power of the Access Point to get the appropriate coverage for your wireless network. Select the level you need for your environment. If you are not sure which setting to choose, then keep the default setting, Full (Default). CTS Protection Mode The CTS (Clear-To-Send) Protection Mode function boosts the Access Point's ability to catch all Wireless-G transmissions but will severely decrease performance. Select Enable if you want to permanently enable this feature, or keep the default, Disable, if you want to permanently disable this feature. In most cases, CTS Protection Mode should remain disabled, unless the Wireless-G products are experiencing severe problems trying to transmit to the Access Point in an environment with heavy 802.11b traffic. Frame Burst Mode Enabling this option should reduce overhead and enhance your network performance, depending on the manufacturer of your wireless products. If you are not sure how to use this option, keep the default, Disabled. Antenna Selection This selection is for choosing which antenna transmits data, left or right. If you are not sure which antenna to use, keep the default, Diversity, to increase reception. Beacon Interval. This value indicates the frequency interval of the beacon. A beacon is a packet broadcast by the Access Point to keep the network synchronized. A beacon includes the wireless networks service area, the Access Point address, the Broadcast destination addresses, a time stamp, Delivery Traffic Indicator Maps, and the Traffic Indicator Message (TIM). DTIM Interval This value indicates how often the Access Point sends out a Delivery Traffic Indication Message (DTIM). Lower settings result in more efficient networking, while preventing your PC from dropping into powersaving sleep mode. Higher settings allow your PC to enter sleep mode, thus saving power, but interferes with wireless transmissions. Fragmentation Threshold This specifies the maximum size a data packet can be before splitting and creating a new packet. It should remain at its default setting of 2346. A smaller setting means smaller packets, which will create more packets for each transmission. If you have decreased this value and experience high packet error rates, you can increase it again, but it will likely decrease overall network performance. Only minor modifications of this value are recommended. RTS Threshold. This setting determines how large a packet can be before the Access Point coordinates transmission and reception to ensure efficient communication. This value should remain at its default setting of 2347. Should you encounter inconsistent data flow, only minor modifications are recommended. Wireless-G Access Point Configuration Change these settings as described here and click Save Settings to apply your changes, or click Cancel Changes to cancel your changes. Click Help for more information. The Administration Tab > Management On this screen you can configure the password as well as back up or restore the Access Point's configuration file. Administration > Management Management You should change the password that controls access to the Access Point's Web-based Utility. AP's Password Password Create a Password for the Access Point's Webbased Utility. Re-enter to Confirm To confirm the new Password, enter it again in this field. Backup and Restore On this screen you can create a backup configuration file or save a configuration file to the Access Point. Backup Settings To save a backup configuration file on a computer, click Backup Settings and follow the onscreen instructions. Restore Settings To upload a configuration file to the Access Point, click Restore Settings and follow the onscreen instructions. Change these settings as described here and click Save Settings to apply your changes, or click Cancel Changes to cancel your changes. Click Help for more information. 19
-
 1
1 -
2
-
3
-
4
-
5
-
6
-
7
-
8
-
9
-
10
-
11
-
12
-
13
-
14
-
 15
15 -
 16
16 -
 17
17 -
 18
18 -
 19
19 -
 20
20 -
 21
21 -
 22
22 -
 23
23 -
 24
24 -
 25
25 -
26
-
27
-
28
-
29
-
30
-
31
-
32
-
33
-
34
-
35
-
36
-
37
-
38
-
39
-
40
-
41
-
42
-
43
-
44
-
45
 |
 |
