Linksys WAP54G User Guide - Page 21
The Administration Tab > SNMP, SNMP V1/V2c, SNMP Community, Management - default ip
 |
UPC - 745883553860
View all Linksys WAP54G manuals
Add to My Manuals
Save this manual to your list of manuals |
Page 21 highlights
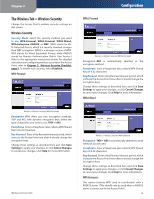
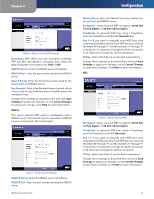
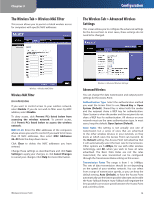
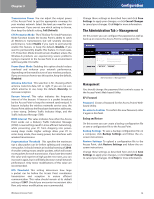
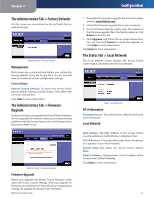
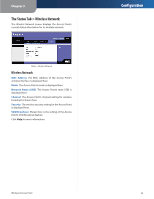
Chapter 3 The Administration Tab > SNMP SNMP is a popular network monitoring and management protocol. It provides network administrators with the ability to monitor the status of the Access Point and receive notification of any critical events as they occur on the Access Point. Configuration The Administration Tab > Log On this screen you can configure the log settings. Administration > SNMP SNMP V1/V2c To enable the SNMP support feature, select Enable. Otherwise, select Disable. Contact Enter the name of the contact person, such as a network administrator, for the Access Point. Device Name Enter the name you wish to give to the Access Point. Location Enter the location of the Access Point. SNMP Community You can have up to two passwords. Then select the level of access you want to assign to each password. (public) Enter the first password that allows access to the Access Point's SNMP information. The default is public. Then select the level of access you want to assign, ReadOnly or Read/Write. (private) Enter the second password that allows access to the Access Point's SNMP information. The default is private. Then select the level of access you want to assign, Read-Only or Read/Write. Change these settings as described here and click Save Settings to apply your changes, or click Cancel Changes to cancel your changes. Click Help for more information. Administration > Log Management You can have logs that keep track of the Access Point's activities. Log To enable the Log support feature, select Enabled. Otherwise, select Disabled. Logviewer IP Address If you have chosen to monitor the Access Point's traffic, then you can designate a PC that will receive permanent log files periodically. In the field provided, enter the IP address of this PC. To view these permanent logs, you must use Logviewer software, which can be downloaded free of charge from www.linksys. com. View Log To see a temporary log of the Access Point's most recent activities, click this button. The View Log screen appears. View Log Screen On the View Log screen, click First Page to see the first page of log entries. Click Last Page to see the last page of log entries. Click Previous Page to see the previous page of log entries, and click Next Page to see the next page of log entries. To delete all log entries, click Clear Log. To update the log with the most recent activities, click Refresh. Change these settings as described here and click Save Settings to apply your changes, or click Cancel Changes to cancel your changes. Click Help for more information. Wireless-G Access Point 20
-
 1
1 -
2
-
3
-
4
-
5
-
6
-
7
-
8
-
9
-
10
-
11
-
12
-
13
-
14
-
15
-
 16
16 -
 17
17 -
 18
18 -
 19
19 -
 20
20 -
 21
21 -
 22
22 -
 23
23 -
 24
24 -
 25
25 -
 26
26 -
27
-
28
-
29
-
30
-
31
-
32
-
33
-
34
-
35
-
36
-
37
-
38
-
39
-
40
-
41
-
42
-
43
-
44
-
45
 |
 |
