MSI rc410M2 User Guide - Page 21
MS-7173 Mainboard
 |
View all MSI rc410M2 manuals
Add to My Manuals
Save this manual to your list of manuals |
Page 21 highlights
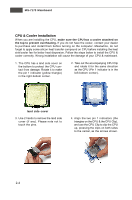
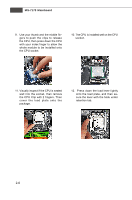
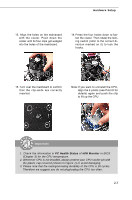
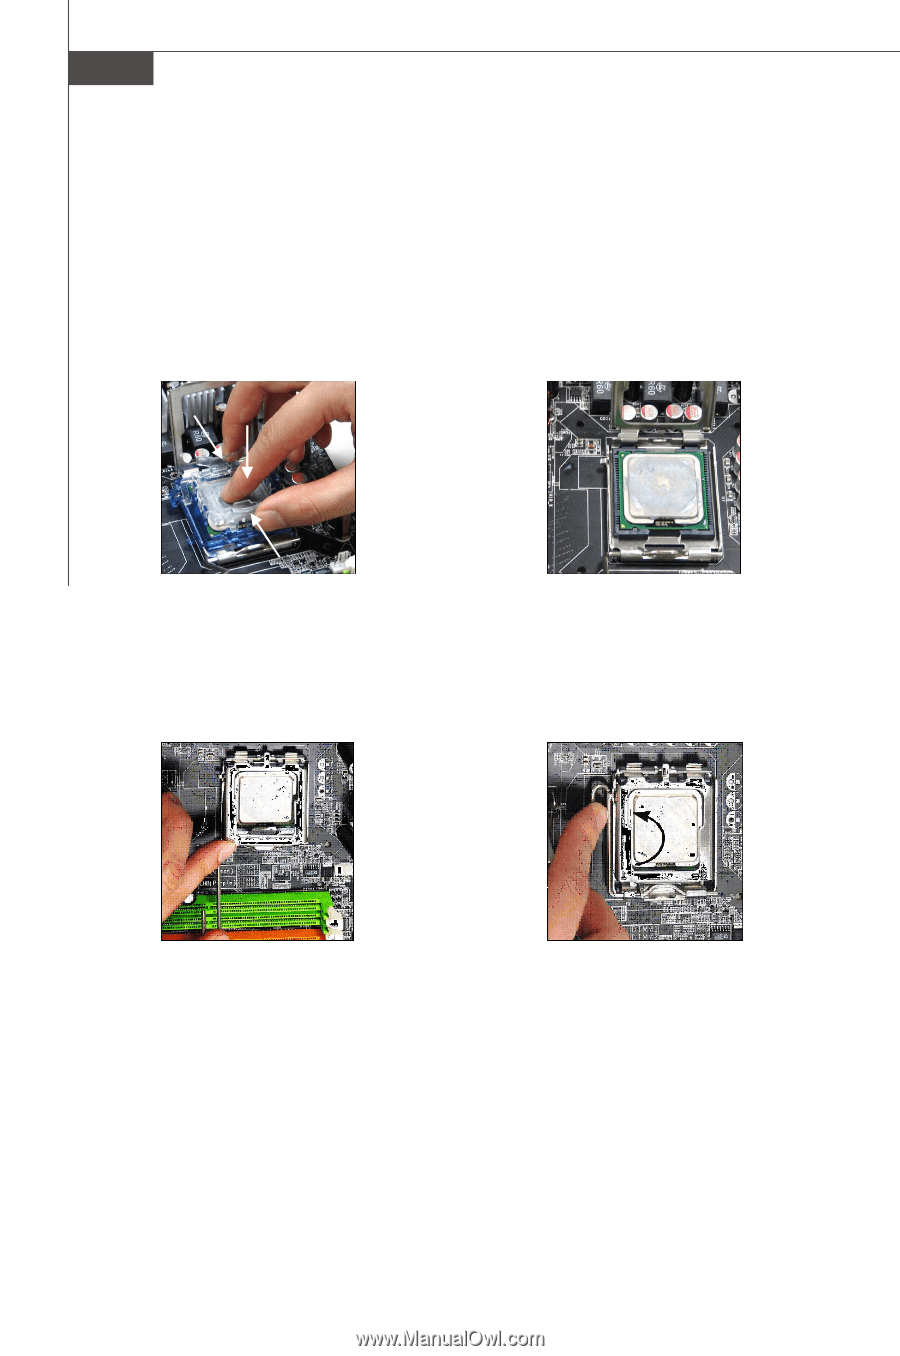
MS-7173 Mainboard 9. Use your thumb and the middle fingers to push the clips to release the CPU, then press down the CPU with your index finger to allow the whole module to be installed onto the CPU socket. 10. The CPU is installed well on the CPU socket. 11. Visually inspect if the CPU is seated well into the socket, then remove the CPU Clip with 2 fingers. Then cover the load plate onto the p ac kage. 12. Press down the load lever lightly onto the load plate, and then secure the lever with the hook under retention tab. 2-6
-
 1
1 -
2
-
3
-
4
-
5
-
6
-
7
-
8
-
9
-
10
-
11
-
12
-
13
-
14
-
15
-
 16
16 -
 17
17 -
 18
18 -
 19
19 -
 20
20 -
 21
21 -
 22
22 -
 23
23 -
 24
24 -
 25
25 -
 26
26 -
27
-
28
-
29
-
30
-
31
-
32
-
33
-
34
-
35
-
36
-
37
-
38
-
39
-
40
-
41
-
42
-
43
-
44
-
45
-
46
-
47
-
48
-
49
-
50
-
51
-
52
-
53
-
54
-
55
-
56
-
57
-
58
-
59
-
60
-
61
-
62
-
63
-
64
-
65
-
66
-
67
-
68
-
69
-
70
-
71
-
72
-
73
-
74
-
75
-
76
-
77
-
78
-
79
-
80
-
81
-
82
-
83
-
84
-
85
-
86
-
87
-
88
-
89
-
90
-
91
-
92
-
93
-
94
-
95
-
96
-
97
-
98
-
99
-
100
-
101
-
102
-
103
-
104
-
105
-
106
-
107
 |
 |
MS-7173 Mainboard
2-6
12. Press down the load lever lightly
onto the load plate, and then se-
cure the lever with the hook under
retention tab.
11. Visually inspect if the CPU is seated
well into the socket, then remove
the CPU Clip with 2 fingers. Then
cover the load plate onto the
package.
9.
Use your thumb and the middle fin-
gers to push the clips to release
the CPU, then press down the CPU
with your index finger to allow the
whole module to be installed onto
the CPU socket.
10. The CPU is installed well on the CPU
socket.