Magellan eXplorist 500 Manual - English - Page 82
Using the Simulator, Simulating on a Saved Route, Arrow, ENTER
 |
UPC - 763357109405
View all Magellan eXplorist 500 manuals
Add to My Manuals
Save this manual to your list of manuals |
Page 82 highlights
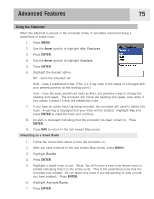
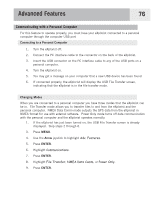
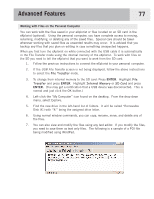
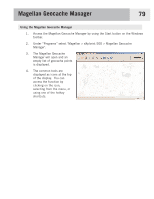
Advanced Features 75 Using the Simulator When the eXplorist is placed in the simulator mode, it simulates movement along a predefined or saved route. 1. Press MENU. 2. Use the Arrow joystick to highlight Adv. Features. 3. Press ENTER. 4. Use the Arrow joystick to highlight Simulate. 5. Press ENTER. 6. Highlight the desired option: Off - Turns the simulator off Auto - Uses a predefined route. (This is a 3-leg route in the shape of a triangle with your present position as the starting point.) User - Uses the same predefined route as Auto, but provides a way to change the heading and speed. The simulator will follow the heading and speed, even when if this means it doesn't follow the predefined route. 7. If you have an active track log being recorded, the simulator will need to delete this track. A warning is displayed that your track will be deleted. Highlight Yes and press ENTER to erase the track and continue. 8. An alert is displayed indicating that the simulator has been turned on. Press ENTER. 9. Press NAV to return to the last viewed Map screen. Simulating on a Saved Route 1. Follow the instructions above to turn the simulator on. 2. After you have returned to the last viewed Map screen, press MENU. 3. Highlight Routes. 4. Press ENTER. 5. Highlight a saved route to use. (Note: You will notice a new route whose name is bolded indicating that it is the active route. This is the predefined route that the simulator has created. Do not select this route if you are wanting to view a route you have created.) Press ENTER. 6. Highlight Activate Route. 7. Press ENTER.
-
 1
1 -
2
-
3
-
4
-
5
-
6
-
7
-
8
-
9
-
10
-
11
-
12
-
13
-
14
-
15
-
16
-
17
-
18
-
19
-
20
-
21
-
22
-
23
-
24
-
25
-
26
-
27
-
28
-
29
-
30
-
31
-
32
-
33
-
34
-
35
-
36
-
37
-
38
-
39
-
40
-
41
-
42
-
43
-
44
-
45
-
46
-
47
-
48
-
49
-
50
-
51
-
52
-
53
-
54
-
55
-
56
-
57
-
58
-
59
-
60
-
61
-
62
-
63
-
64
-
65
-
66
-
67
-
68
-
69
-
70
-
71
-
72
-
73
-
74
-
75
-
76
-
 77
77 -
 78
78 -
 79
79 -
 80
80 -
 81
81 -
 82
82 -
 83
83 -
 84
84 -
 85
85 -
 86
86 -
 87
87 -
88
-
89
-
90
-
91
-
92
-
93
-
94
-
95
-
96
-
97
-
98
-
99
-
100
-
101
-
102
-
103
-
104
-
105
-
106
-
107
-
108
-
109
-
110
-
111
-
112
-
113
-
114
-
115
-
116
-
117
-
118
-
119
 |
 |
