Marantz AV8003 AV8003 User Manua - Page 30
Auto Setup Multeq™ Setup - av
 |
View all Marantz AV8003 manuals
Add to My Manuals
Save this manual to your list of manuals |
Page 30 highlights
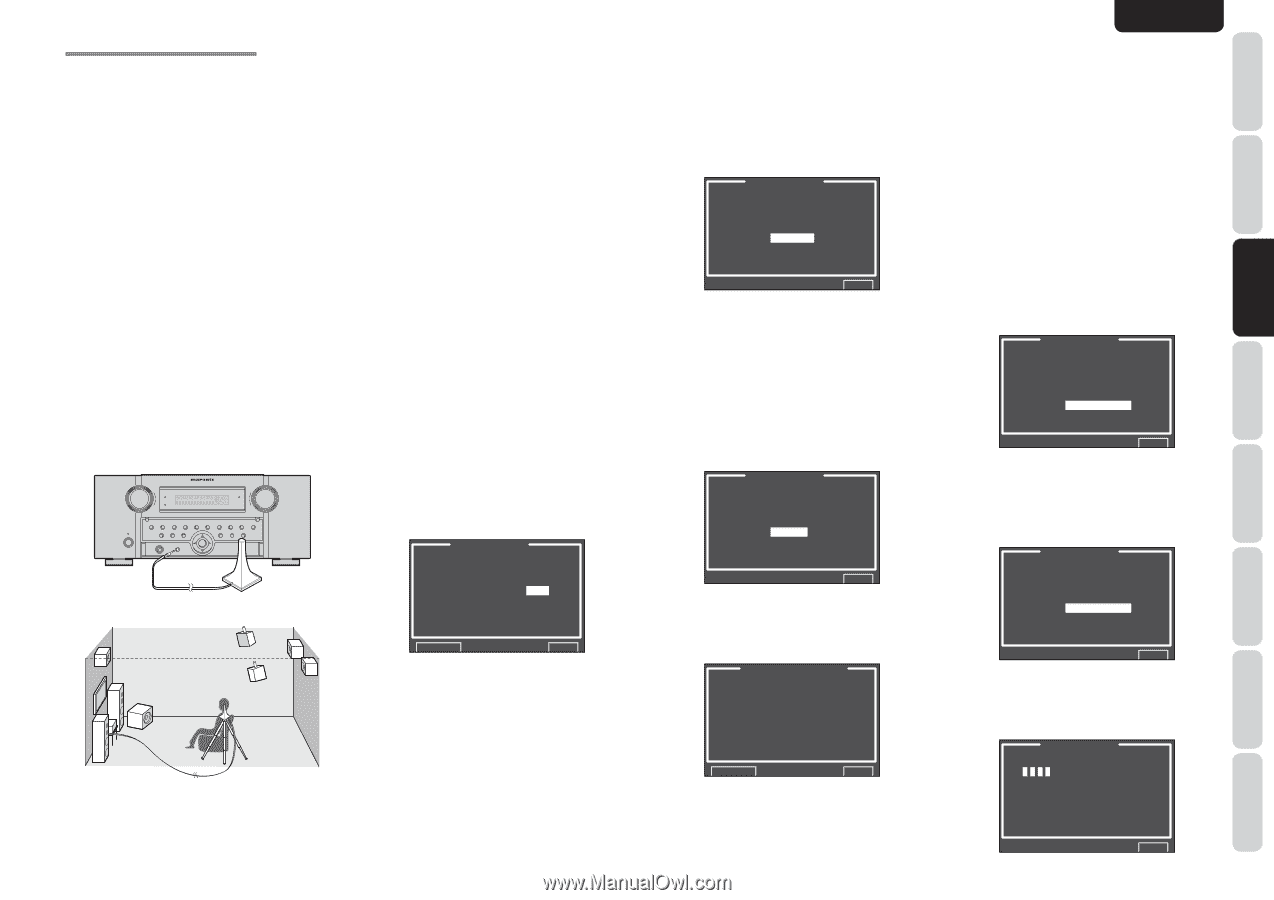
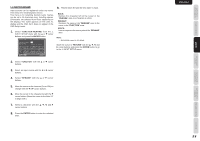
ENGLISH NAMES AND FUNCTION CONNECTIONS SETUP BASIC OPERATION 2-1 AUTO SETUP (MultEQ™ SETUP) The AUTO SETUP (MultEQ™ Setup) feature of the unit measures sound characteristics of the speaker system and room where the unit is used and automatically optimizes settings. The Audyssey MultEQ™ technology adopted by this unit provides the best listening environment for multiple listeners. To do this, the AUTO SETUP feature measures a test tone emitted by each channel in a maximum of 6 listening positions, using the supplied microphone. The measurement results are analyzed using an original algorithm and environmental settings are made to improve the sound characteristics of the listening area. To set up the speaker system (i.e., adjusting speaker distance, etc.) without using the AUTO SETUP feature, see "MANUAL SETUP" on page 30 of the manual. HOW TO PERFORM AUTO SETUP During measurement, the OSD menu displays the condition, therefore turn power to the monitor on. 1. Connect the speakers, power amp of a MM8003 or other amp to this unit and place the speakers in suitable locations. 2. Connect the supplied microphone to the MIC jack on the unit. STANDBY POWER ON/OFF INPUT SELECTOR PURE DIRECT M-DAX AV PRE TUNER AV8003 UP HDMI DOWN VOLUME SURROUND MODE AUTO ZONE ZONE SPEAKER PURE DIRECT THX 7.1CH INPUT PHONES SETUP MIC MENU EXIT ENTER BAND T-MODE MEMORY CLEAR TOP M-DAX DISPLAY 3. Set the microphone in the listening position. Notes: • Measurement can be done in a maximum of 6 listening positions. For the first measurement, set the microphone in the main listening position. • Use a stand or tripod to position the microphone at ear height in the listening position. • Remove any obstructions between the speakers and microphone. • To use the internal subwoofer of the amp, set the volume to the middle point and set the crossover frequency to the highest. • During measurement, step away from the microphone and operate the unit via the remote controller from a position that is out of the path of the speaker sound. • The test tone output from the speakers during measurement is loud. Be mindful of neighbors and watch out for small children. 4. Select "2. SPKR SETUP" from the MAIN MENU, select "AUTO SETUP" with the 3/4 cursor buttons, and press the ENTER button to display the start screen. 5. Select the number of channels for the surround back speaker you are using. For a 5.1 channel speaker system, select "NON" (Surround Back speaker off). (To use speaker C or zone speaker, select "NON". See page 19, 36.) Select "START" with the 3/4 cursor buttons and press the ENTER button to start measurement. AUTO SETUP AUTO SETUP: START MAIN ZONE SURR BACK: 2CH RETURN EXIT 6. 1 st Position Check During the first position check, the following screen is displayed as the unit checks background noise in the listening room, presence of speakers, and speaker polarity and measures the acoustical characteristics in the first position where the microphone is set up. AUTO SETUP SPEAKERS CHECK:-1st MIC POSITION NOW ANALYZING !! CANCEL EXIT Note: • The detection check measures the state of use of all speakers whether actually used or not. For example, if the center speaker is not used, the test tone will require time to go from the L-channel to the R-channel, therefore be careful not to unplug the microphone or operate this unit during this time. 7. When the 1 st Position Check ends, the following OSD appears on the display. AUTO SETUP SPEAKERS CHECK:OK 2nd MIC POSITION!! START CHECK CALCULATE EXIT Here, to view the results of the detection check, select "CHECK" with the 3/4 cursor buttons and press the ENTER button. The results will be displayed. SPEAKER CONFIG CHECK !! SPEAKER FRONT : YES CENTER : NON FRONT R : YES SURR.R : YES SURR.B R : NON SURR.B L : NON SURR.L : YES SUB W : YES RETURN EXIT If the check results indicate an error, take suitable action with that item and remeasure. (For error messages, see "ERROR MESSAGES" on page 29.) After confirming the check results, select "RETURN" with the 3/4 cursor buttons and press the ENTER button to return to the OSD menu. At this point, you can select "EXIT" to end Auto Setup and return to "2. SPKR SETUP". Note: • AUTO SETUP is not available in Pure Direct, Source Direct, or 7.1 Channel Input modes. 8. Move the microphone to the second listening position, select "START" with the 3/4 cursor buttons and press the ENTER button to measure the second point. At this point, you can cancel second point measurement and calculate measurement results by selecting "CALCULATE" and pressing the ENTER button. AUTO SETUP SPEAKERS CHECK:OK 2nd MIC POSITION!! START CHECK CALCULATE EXIT 9. Repeat steps 7 until measuring 6 points between the main listening position and surrounding positions. When all measurements end, the following OSD appears on the display. AUTO SETUP SPEAKERS CHECK:OK CALCULATE EXIT Select "CALCULATE" with the 3/4 cursor buttons and press the ENTER button to calculate measurement results. During calculations, the following OSD appears on the display. AUTO SETUP NOW CALCULATING! EXIT 27 ADVANCED OPERATION REMOTE CONTROLLER TROUBLESHOOTING OTHERS
-
 1
1 -
2
-
3
-
4
-
5
-
6
-
7
-
8
-
9
-
10
-
11
-
12
-
13
-
14
-
15
-
16
-
17
-
18
-
19
-
20
-
21
-
22
-
23
-
24
-
 25
25 -
 26
26 -
 27
27 -
 28
28 -
 29
29 -
 30
30 -
 31
31 -
 32
32 -
 33
33 -
 34
34 -
 35
35 -
36
-
37
-
38
-
39
-
40
-
41
-
42
-
43
-
44
-
45
-
46
-
47
-
48
-
49
-
50
-
51
-
52
-
53
-
54
-
55
-
56
-
57
-
58
-
59
-
60
-
61
-
62
-
63
-
64
-
65
-
66
-
67
-
68
-
69
-
70
-
71
-
72
-
73
-
74
-
75
-
76
-
77
-
78
-
79
-
80
-
81
-
82
-
83
-
84
-
85
-
86
-
87
-
88
-
89
-
90
-
91
-
92
-
93
-
94
-
95
-
96
-
97
-
98
-
99
-
100
-
101
-
102
-
103
-
104
-
105
-
106
-
107
 |
 |