Maytag MEDB800VQ Use and Care Guide - Page 21
Reverse
 |
UPC - 883049140506
View all Maytag MEDB800VQ manuals
Add to My Manuals
Save this manual to your list of manuals |
Page 21 highlights
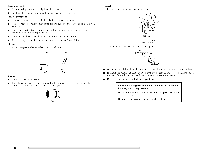
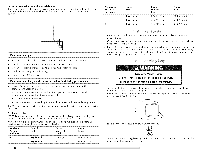
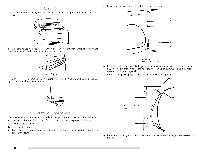
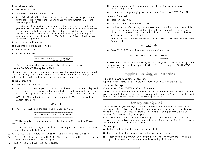
Revertsheestrike 1. Remove the door strike from the dryer door opening. 2. Remove the cosmetic cover opposite the door strike. A[ / \ B 3. Remove the 4 screws from the opposite side of the door. I A. Door strike B. Cosmetic cover 3. Reinstall the door strike and cosmetic cover on the opposite side of the dryer door opening from where they were removed. NOTE: Door strike and plugs must be on the same side of the dryer door opening. Reinstall the door 1. Remove the 4 screws and 2 hinges from the dryer door. 2. Replace the 4 screws in the same holes. Screw locations 4° Install the 2 hinges to the front panel of the dryer using 4 screws. Use the non-slotted side to attach the hinge to the front panel. Screw c_,hinge locations --}D,_
-
 1
1 -
2
-
3
-
4
-
5
-
6
-
7
-
8
-
9
-
10
-
11
-
12
-
13
-
14
-
15
-
 16
16 -
 17
17 -
 18
18 -
 19
19 -
 20
20 -
 21
21 -
 22
22 -
 23
23 -
 24
24 -
 25
25 -
 26
26 -
27
-
28
-
29
-
30
-
31
-
32
-
33
-
34
-
35
-
36
-
37
-
38
-
39
-
40
-
41
-
42
-
43
-
44
-
45
-
46
-
47
-
48
-
49
-
50
-
51
-
52
-
53
-
54
-
55
-
56
-
57
-
58
-
59
-
60
-
61
-
62
-
63
-
64
 |
 |

Reverse
the
strike
1.
Remove
the
door
strike
from
the dryer
door
opening.
2.
Remove
the
cosmetic
cover
opposite
the
door
strike.
A[
/
\
B
3.
Remove
the
4 screws
from
the opposite
side
of the
door.
I
A. Door
strike
B. Cosmetic
cover
3.
Reinstall
the
door
strike
and
cosmetic
cover
on the opposite
side
of the
dryer
door
opening
from
where
they
were
removed.
NOTE:
Door
strike
and
plugs
must
be on
the
same side
of the dryer
door
opening.
Reinstall
the
door
1.
Remove the 4 screws and 2 hinges from the dryer door.
2.
Replace the 4 screws in the same holes.
Screw
c_,
hinge
locations
--}D,_
4°
Screw
locations
Install
the 2 hinges
to the
front
panel
of the dryer
using
4 screws.
Use the
non-slotted
side
to
attach
the
hinge
to the front
panel.