Maytag MMMF6030PZ Owners Manual - Page 10
Mark Upper Cabinet, follow the step 3
 |
View all Maytag MMMF6030PZ manuals
Add to My Manuals
Save this manual to your list of manuals |
Page 10 highlights
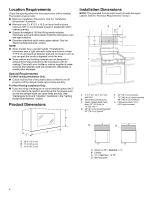
Mark Upper Cabinet 1. Using measuring tape, and clearly mark the vertical centerline of the opening. Make sure it is align with the vertical wall centerline. A Flush to cabinet door E A B A D B C A. Front Edge of Cardboard Plate & Upper Cabinet A. Upper Cabinet Centerline B. Wall Centerline Door B. Upper Cabinet & Cardboard Plate 0.75" (1.9 cm) Line C. Mounting plate NOTE: The cardboard plate is fit for depth of 12" to 13" (30.4 cm to 33.02 cm) cabinet installation, but need some D. Microwave oven door E. Cabinet adjustment for different depth. See the following steps 2, 3. If your cabinet is 12" to 12.75" (30.5 cm to 32.4 cm) depth, If your cabinet depth is 12.75" to 13" (32.4 cm to 33 cm) follow the step 3: depth: 3. Place the cardboard plate against the bottom of the upper 2. Place the cardboard plate against the bottom of the upper cabinet. cabinet. NOTES: NOTES: � Make sure the front edge of the cardboard plate B A align with the front edge � Make sure the back edge of the cardboard B A plate align with the back edge of upper cabinet. of upper cabinet. � Make sure the center � Make sure the center marks on the cardboard plate align with the upper cabinet centerline which draw in step 1. A. (Flush) 12.75" ≤ DEEPER ≤ 13" B. Cabinet marks on the cardboard plate align with the upper cabinet centerline which draw in step 1. � Make sure the arrow on the cardboard plate are facing out.. A. 12" < DEEPER < 12.75" B. Cabinet C A D B A. Front Edge of Cardboard Plate & Front Edge of Upper Cabinet B. Upper Cabinet Centerline C. Arrows on Cardboard Plate D. Center Marks on Cardboard Plate NOTE: If the upper cabinet doors protrude from the upper cabinet, the cardboard can be adjusted outward to be flush with the upper cabinet door. For example the upper cabinet door is 0.75" (1.9 cm) thick, you can align the cardboard plate 0.75" (1.9 cm) line with the upper cabinet. B A A. Back Edge of Cardboard Plate & Back Edge of Upper Cabinet B. Upper Cabinet Centerline & Center Marks on Cardboard Plate 4. Using a pencil to mark a power cord hole and two mounting nut holes. B A A. Power Cord Hole B. Mounting Nut Holes 10
-
 1
1 -
2
-
3
-
4
-
 5
5 -
 6
6 -
 7
7 -
 8
8 -
 9
9 -
 10
10 -
 11
11 -
 12
12 -
 13
13 -
 14
14 -
 15
15 -
16
-
17
-
18
-
19
-
20
-
21
-
22
-
23
-
24
-
25
-
26
-
27
-
28
-
29
-
30
-
31
-
32
-
33
-
34
-
35
-
36
-
37
-
38
-
39
-
40
 |
 |
