NEC V754Q Users Manual - English - Page 10
Installing an ²ption Board, Installing and Removing the ²ptional
 |
View all NEC V754Q manuals
Add to My Manuals
Save this manual to your list of manuals |
Page 10 highlights
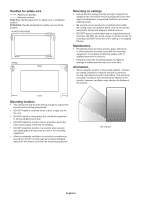
Mounting Interface (M8) 600 mm 3. Installing an Option Board 1. Turn off the main power switch. 2. Place the monitor face down on the protective sheet. NOTE: Be sure to place the monitor on a flat and adequate space. 3. Remove the attached slot cover by unscrewing the installed screws (Figure 1), sliding to right (Figure 2) and moving up (Figure 3). 400 mm 4. Installing and Removing the Optional Table Top Stand CAUTION: Installing and removing the stand must be done by four or more people. For installation, follow the instructions included with the stand or mounting equipment. Use only those devices recommended by the manufacturer. NOTE: ONLY use screws which are supplied with the optional table top stand. When installing the LCD monitor stand, handle the unit with care to avoid pinching your fingers. Optional table top stand Table NOTE: NOTE: Protective Sheet Install the stand in the direction of the arrow which is imprinted on the surface of the stand. Use the ST-801. V984Q: DO NOT use this monitor on the floor with the table top stand. Please use this monitor on a table or with a mounting accessory for support. Figure 1 Figure 2 Figure 3 Figure 4 4. Insert the Option Board into the monitor and fix it with the removed screws (Figure 4). NOTE: Please contact your supplier for a list of Option Boards available for your monitor. Do not apply excessive force to manipulate the Option Board before fixing it with screws. Make sure that the board is inserted into the slot in the correct orientation. CAUTION: Ensure the Option Board is attached by the removed screws. Otherwise, the Option Board may fall out and expose you to danger. (Recommended Fasten Force: 139 - 189N•cm). English-8
-
 1
1 -
2
-
3
-
4
-
 5
5 -
 6
6 -
 7
7 -
 8
8 -
 9
9 -
 10
10 -
 11
11 -
 12
12 -
 13
13 -
 14
14 -
 15
15 -
16
-
17
-
18
-
19
-
20
-
21
-
22
-
23
-
24
-
25
-
26
-
27
-
28
-
29
-
30
-
31
-
32
-
33
-
34
-
35
-
36
-
37
-
38
-
39
-
40
-
41
-
42
-
43
-
44
-
45
-
46
-
47
-
48
-
49
-
50
-
51
-
52
-
53
-
54
-
55
-
56
-
57
-
58
-
59
-
60
-
61
-
62
-
63
-
64
-
65
-
66
-
67
-
68
-
69
-
70
-
71
-
72
-
73
-
74
-
75
-
76
-
77
-
78
-
79
-
80
 |
 |
