NEC V754Q Users Manual - English - Page 53

Controlling the LCD monitor via LcO Control

Page 53 highlights

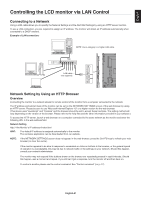
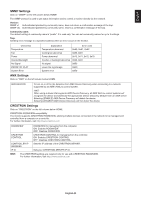
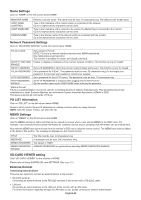
English Controlling the LCD monitor via LAN Control Connecting to a Network Using a LAN cable allows you to specify the Network Settings and the Alert Mail Settings by using an HTTP server function. To use a LAN connection, you are required to assign an IP address. The monitor will obtain an IP address automatically when connected to a DHCP network. Example of LAN connection: Server NOTE: Use a category 5 or higher LAN cable. Hub LAN cable (not supplied) Network Setting by Using an HTTP Browser Overview Connecting the monitor to a network allows for remote control of the monitor from a computer connected to the network. The IP address and subnet mask of the monitor can be set on the NETWORK SETTINGS screen of the web browser by using an HTTP server. Please be sure to use "Microsoft Internet Explorer 10" or a higher version for the web browser. (This device uses "JavaScript" and "Cookies" and the browser should be set to accept these functions. The setting method will vary depending on the version of the browser. Please refer to the help files and the other information provided in your software.) To access the HTTP server, launch a web browser on a computer connected to the same network as the monitor and enter the following URL in the web address field. Network Setting http://

  • 1
  • 2
  • 3
  • 4
  • 5
  • 6
  • 7
  • 8
  • 9
  • 10
  • 11
  • 12
  • 13
  • 14
  • 15
  • 16
  • 17
  • 18
  • 19
  • 20
  • 21
  • 22
  • 23
  • 24
  • 25
  • 26
  • 27
  • 28
  • 29
  • 30
  • 31
  • 32
  • 33
  • 34
  • 35
  • 36
  • 37
  • 38
  • 39
  • 40
  • 41
  • 42
  • 43
  • 44
  • 45
  • 46
  • 47
  • 48
  • 49
  • 50
  • 51
  • 52
  • 53
  • 54
  • 55
  • 56
  • 57
  • 58
  • 59
  • 60
  • 61
  • 62
  • 63
  • 64
  • 65
  • 66
  • 67
  • 68
  • 69
  • 70
  • 71
  • 72
  • 73
  • 74
  • 75
  • 76
  • 77
  • 78
  • 79
  • 80

English-51
English
Conne³ting to a Oetwork
Using a LAN cable allows you to specify the Network Settings and the Alert Mail Settings by using an HTTP server function.
To use a LAN connection, you are required to assign an IP address. The monitor will obtain an IP address automatically when
connected to a DHCP network.
Example of LcO ³onne³tion°
Server
Hub
NOTE: Use a category 5 or higher LAN cable.
LAN cable
(not supplied)
Oetwork Setting by Using an H±±P Browser
²verview
Connecting the monitor to a network allows for remote control of the monitor from a computer connected to the network.
The IP address and subnet mask of the monitor can be set on the NETWORK SETTINGS screen of the web browser by using
an HTTP server. Please be sure to use “Microsoft Internet Explorer 10” or a higher version for the web browser.
(This device uses “JavaScript” and “Cookies” and the browser should be set to accept these functions. The setting method will
vary depending on the version of the browser. Please refer to the help files and the other information provided in your software.)
To access the HTTP server, launch a web browser on a computer connected to the same network as the monitor and enter the
following URL in the web address field.
Oetwork Setting
http://<the Monitor’s IP address>/index.html
HIO±°
The default IP address is assigned automatically to the monitor.
The exclusive application can be downloaded from our website.
O²±E°
If the NETWORK SETTINGS screen does not appear in the web browser, press the Ctrl+F5 keys to refresh your web
browser (or clear the cache).
If the monitor appears to be slow in response to commands or clicks on buttons in the browser, or the general speed
of operation is unacceptable, this may be due to network traffic or the settings on your network. Should this happen,
consult your network administrator.
The monitor may not respond if the buttons shown on the browser are repeatedly pressed in rapid intervals. Should
this happen, wait a moment and repeat. If you still can’t get a response, turn the monitor off and then back on.
To control a monitor please use the control command. See “Control command” (
page 57
).
Controlling the LCD monitor via LcO Control