NEC V754Q Users Manual - English - Page 58
Oame Settings, Oetwork Password Settings, MEM² Settings, SD-CcRD VIEWER setting, External Control
 |
View all NEC V754Q manuals
Add to My Manuals
Save this manual to your list of manuals |
Page 58 highlights
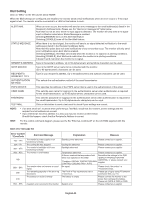
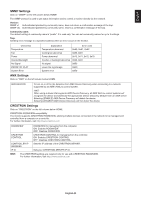
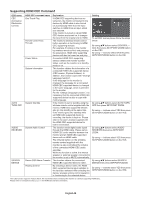
Name Settings Click on "NAME" on the left column below HOME. MONITOR NAME HOST NAME (CONTROL) HOST NAME (MP) DOMAIN NAME Defines a monitor name. The name must be max. 16 characters long. The default is the model name. Type in the hostname of the monitor which is connected to the network. Up to 15 alphanumeric characters can be used. Type in the hostname of the network to be used in the Media Player connected to the monitor. Up to 15 alphanumeric characters can be used. Type in the domain name of the network which is connected with the monitor. Up to 60 alphanumeric characters can be used. Network Password Settings Click on "NETWORK SERVICE" on the left column below HOME. PJLink CLASS NOTIFY FUNCTION ENABLE NOTIFY ADDRESS PJLink PASSWORD Set a class for PJLink*. NOTE: PJLink is a network interface standard that JBMIA established. http://pjlink.jbmia.or.jp/index.html This monitor is available for class1 and class2 command. Enable or disable a notification of the monitor network condition. This function is only for class2. Set an IP ADDRESS to which the monitor network status will be sent. This function is only for class2. Set a password for PJLink*. The password must be max. 32 characters long. Do not forget your password. If you forget your password, consult your supplier. HTTP PASSWORD Set a password for the HTTP server. The password must be max. 10 characters long. HTTP PASSWORD An HTTP PASSWORD is required when logging into the HTTP server. ENABLE Set the monitor name as the USER NAME when entering the password. *What is PJLink? PJLink is a standardization of protocol used for controlling devices of different manufacturers. This standard protocol was established by Japan Business Machine and Information System Industries Association (JBMIA) in 2005. The device supports all commands of PJLink. PD LIST Information Click on "PD LIST" on the left column below HOME. Shows a list of monitor IDs and IP addresses of multiple monitors which are daisy-chained. NOTE: Only the master monitor can show the list. MEMO Settings Click on "MEMO" on the left column below HOME. Use the MEMO settings to define text that can be viewed on-screen when a user selects MEMO in the OSD menu. For example, if you want to provide contact information for customer service at your company, that information can be entered here. Note that the MEMO text cannot be set from the monitor's OSD menu using the remote control. The MEMO text must be added in the fields in this section. The message is displayed on the monitor screen. TITLE MESSAGE MEMO PASSWORD MEMO PASSWORD ENABLE The title must be max. 24 characters long. A message must be max. 240 characters long. The default is "0000". A MEMO PASSWORD is required when selecting MEMO PASSWORD ENABLE. SD-CARD VIEWER setting Click "SD-CARD VIEWER" on the left side of HOME. Please refer to Using SHARED SD card SETTINGS (See page 27). External Control Connecting external device There are two options to connect an external device to the monitor. • RS-232C terminal. Connecting an external device to the RS-232C terminal of the monitor with a RS-232C cable. • LAN port. Connecting an external device to the LAN port of the monitor with a LAN cable. For further information regarding the type of LAN cable to use, please consult your network administrator. English-56
-
 1
1 -
2
-
3
-
4
-
5
-
6
-
7
-
8
-
9
-
10
-
11
-
12
-
13
-
14
-
15
-
16
-
17
-
18
-
19
-
20
-
21
-
22
-
23
-
24
-
25
-
26
-
27
-
28
-
29
-
30
-
31
-
32
-
33
-
34
-
35
-
36
-
37
-
38
-
39
-
40
-
41
-
42
-
43
-
44
-
45
-
46
-
47
-
48
-
49
-
50
-
51
-
52
-
 53
53 -
 54
54 -
 55
55 -
 56
56 -
 57
57 -
 58
58 -
 59
59 -
 60
60 -
 61
61 -
 62
62 -
 63
63 -
64
-
65
-
66
-
67
-
68
-
69
-
70
-
71
-
72
-
73
-
74
-
75
-
76
-
77
-
78
-
79
-
80
 |
 |