Netgear AC1900-High User Manual - Page 31
Block Access to Your Network, ADVANCED > Security > Access Control
 |
View all Netgear AC1900-High manuals
Add to My Manuals
Save this manual to your list of manuals |
Page 31 highlights
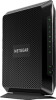
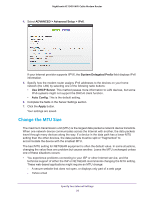
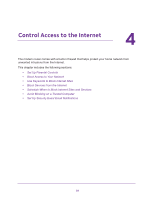
Nighthawk AC1900 WiFi Cable Modem Router After you log on or create your account, the filtering level page displays. 10. Select a radio button for a filtering level and click the Next button. The Setup is complete page displays. 11. Click the Take me to the status page button. The Status page displays. Parental Controls are now set up for the modem router. 12. To enable Parental Controls, click the Enable Live Parental Controls button. Block Access to Your Network You can use access control to block access to your network. To set up access control: 1. Launch an Internet browser from a computer or wireless device that is connected to the network. 2. Type http://www.routerlogin.net or http://www.routerlogin.com. A login window opens. 3. Enter the user name and password. The user name is admin. The user name and password are case-sensitive. The BASIC Home page displays. 4. Select ADVANCED > Security > Access Control. 5. Select the Turn on Access Control check box. You must select this check box before you can specify an access rule and use the Allow and Block buttons. When this check box is cleared, all devices are allowed to connect, even if the device is in the blocked list. 6. To specify the access rule, select one of the following radio buttons: • Allow all new devices to connect. With this setting, if you buy a new device, it can access your network. You don't need to enter its MAC address in this page. NETGEAR recommends that you leave this radio button selected. • Block all new devices from connecting. With this setting, if you buy a new device, before it can access your network, you must enter its MAC address for an Ethernet connection and its MAC address for a WiFi connection in the allowed list. The access rule does not affect previously blocked or allowed devices. It applies only to devices joining your network in the future after you apply these settings. 7. To allow the computer or device you're currently using to continue to access the network, select the check box next to your computer or device, and click the Allow button. 8. Click the Apply button. Your changes take effect. Control Access to the Internet 31
-
 1
1 -
2
-
3
-
4
-
5
-
6
-
7
-
8
-
9
-
10
-
11
-
12
-
13
-
14
-
15
-
16
-
17
-
18
-
19
-
20
-
21
-
22
-
23
-
24
-
25
-
 26
26 -
 27
27 -
 28
28 -
 29
29 -
 30
30 -
 31
31 -
 32
32 -
 33
33 -
 34
34 -
 35
35 -
 36
36 -
37
-
38
-
39
-
40
-
41
-
42
-
43
-
44
-
45
-
46
-
47
-
48
-
49
-
50
-
51
-
52
-
53
-
54
-
55
-
56
-
57
-
58
-
59
-
60
-
61
-
62
-
63
-
64
-
65
-
66
-
67
-
68
-
69
-
70
-
71
-
72
-
73
-
74
-
75
-
76
-
77
-
78
-
79
-
80
-
81
-
82
-
83
-
84
-
85
-
86
-
87
-
88
-
89
-
90
-
91
 |
 |
