Netgear AC1900-High User Manual - Page 80
Application Example: Port Triggering for Internet Relay Chat
 |
View all Netgear AC1900-High manuals
Add to My Manuals
Save this manual to your list of manuals |
Page 80 highlights
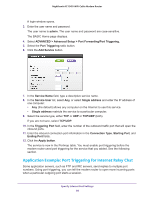
Nighthawk AC1900 WiFi Cable Modem Router A login window opens. 3. Enter the user name and password. The user name is admin. The user name and password are case-sensitive. The BASIC Home page displays. 4. Select ADVANCED > Advanced Setup > Port Forwarding/Port Triggering. 5. Select the Port Triggering radio button. 6. Click the Add Service button. 7. In the Service Name field, type a descriptive service name. 8. In the Service User list, select Any, or select Single address and enter the IP address of one computer: • Any (the default) allows any computer on the Internet to use this service. • Single address restricts the service to a particular computer. 9. Select the service type, either TCP or UDP or TCP/UDP (both). If you are not sure, select TCP/UDP. 10. In the Triggering Port field, enter the number of the outbound traffic port that will open the inbound ports. 11. Enter the inbound connection port information in the Connection Type, Starting Port, and Ending Port fields. 12. Click the Apply button. The service is now in the Portmap table. You must enable port triggering before the modem router used port triggering for the service that you added. See the following section. Application Example: Port Triggering for Internet Relay Chat Some application servers, such as FTP and IRC servers, send replies to multiple port numbers. Using port triggering, you can tell the modem router to open more incoming ports when a particular outgoing port starts a session. Specify Internet Port Settings 80
-
 1
1 -
2
-
3
-
4
-
5
-
6
-
7
-
8
-
9
-
10
-
11
-
12
-
13
-
14
-
15
-
16
-
17
-
18
-
19
-
20
-
21
-
22
-
23
-
24
-
25
-
26
-
27
-
28
-
29
-
30
-
31
-
32
-
33
-
34
-
35
-
36
-
37
-
38
-
39
-
40
-
41
-
42
-
43
-
44
-
45
-
46
-
47
-
48
-
49
-
50
-
51
-
52
-
53
-
54
-
55
-
56
-
57
-
58
-
59
-
60
-
61
-
62
-
63
-
64
-
65
-
66
-
67
-
68
-
69
-
70
-
71
-
72
-
73
-
74
-
 75
75 -
 76
76 -
 77
77 -
 78
78 -
 79
79 -
 80
80 -
 81
81 -
 82
82 -
 83
83 -
 84
84 -
 85
85 -
86
-
87
-
88
-
89
-
90
-
91
 |
 |
