Netgear FSM750S FSM750S Reference Manual - Page 27
of 121 - default ip address
 |
View all Netgear FSM750S manuals
Add to My Manuals
Save this manual to your list of manuals |
Page 27 highlights
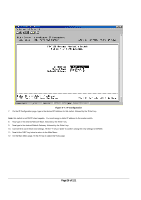
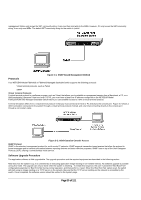
Figure 4-7: IP Configuration 7. On the IP Configuration page, type in the desired IP Address for this switch, followed by the 'Enter' key. Note: this switch is not DHCP client capable. You must assign a static IP address to the master switch. 8. Now type in the desired Network Mask, followed by the 'Enter' key. 9. Now type in the desired Default Gateway, followed by the 'Enter' key. 10. Use Ctrl-W to save these new settings. Hit the 'Y' key or 'Enter' to confirm saving the new settings to NVRAM. 11. Now hit the 'ESC' key twice to return to the Main Menu. 12. On the Main Menu page, hit the 'D' key to select the Tools page. Page 26 of 121
-
 1
1 -
2
-
3
-
4
-
5
-
6
-
7
-
8
-
9
-
10
-
11
-
12
-
13
-
14
-
15
-
16
-
17
-
18
-
19
-
20
-
21
-
 22
22 -
 23
23 -
 24
24 -
 25
25 -
 26
26 -
 27
27 -
 28
28 -
 29
29 -
 30
30 -
 31
31 -
 32
32 -
33
-
34
-
35
-
36
-
37
-
38
-
39
-
40
-
41
-
42
-
43
-
44
-
45
-
46
-
47
-
48
-
49
-
50
-
51
-
52
-
53
-
54
-
55
-
56
-
57
-
58
-
59
-
60
-
61
-
62
-
63
-
64
-
65
-
66
-
67
-
68
-
69
-
70
-
71
-
72
-
73
-
74
-
75
-
76
-
77
-
78
-
79
-
80
-
81
-
82
-
83
-
84
-
85
-
86
-
87
-
88
-
89
-
90
-
91
-
92
-
93
-
94
-
95
-
96
-
97
-
98
-
99
-
100
-
101
-
102
-
103
-
104
-
105
-
106
-
107
-
108
-
109
-
110
-
111
-
112
-
113
-
114
-
115
-
116
-
117
-
118
-
119
-
120
-
121
-
122
-
123
 |
 |

Page 26 of 121
Figure 4-7:
IP Configuration
7.
On the IP Configuration page, type in the desired IP Address for this switch, followed by the ‘Enter’ key.
Note
: this switch is not DHCP client capable.
You must assign a static IP address to the master switch.
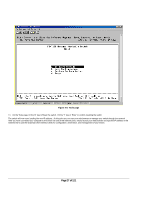
8.
Now type in the desired Network Mask, followed by the ‘Enter’ key.
9.
Now type in the desired Default Gateway, followed by the ‘Enter’ key.
10.
Use Ctrl-W to save these new settings.
Hit the ‘Y’ key or ‘Enter’ to confirm saving the new settings to NVRAM.
11.
Now hit the ‘ESC’ key twice to return to the Main Menu.
12.
On the Main Menu page, hit the ‘D’ key to select the Tools page.