Netgear FSM750S FSM750S Reference Manual - Page 89
of 121
 |
View all Netgear FSM750S manuals
Add to My Manuals
Save this manual to your list of manuals |
Page 89 highlights
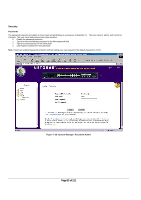
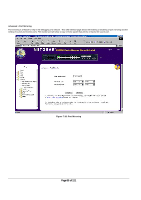
Advanced> VLAN VLANs: A Virtual Local Area Network (VLAN) is a means to electronically separate ports on the same switch from a single broadcast domain into separate broadcast domains. By using VLAN, users can group by logical function instead of physical location. There are 64VLAN supported on this switch. This switch supports static, port-based VLANs. A 'U' or 'T' will be displayed for each port assigned to the VLAN (see Figure 7-21), where 'U' stands for untagged and 'T' for tagged. If a port is an untagged member of a VLAN, the VLAN tag will be striped from the frame before it is sent out that port. If the port is a tagged member of a VLAN, the VLAN tag will stay in the frame when it is sent. A '_' space indicates that the port is not a member of the particular VLAN, and will not get any traffic for that VLAN. The VLAN tagging option is a standard set by the IEEE to facilitate the spanning of VLANs across multiple switches (Reference: Appendix C and IEEE Std 802.1Q-1998 Virtual Bridged Local Area Networks). From this menu, you can create a new VLAN, add new ports to an existing VLAN, remove ports from an existing VLAN or, delete a VLAN. Create a new VLAN Group o Under the 'Show VLAN' drop down menu, select 'Add a new VLAN'. o Enter the VLAN Id and name in the provided fields. o Add VLAN members if so desired. (See below). o Click Apply. Delete a VLAN Group o Check the Remove VLAN box for the VLAN you want to remove. o Click Apply. Add a port to a VLAN Group o Under the 'Show VLAN' drop down menu, select the VLAN you want to edit. o Click the box below the port number on the line of the VLAN so that a 'T' (tagged) or 'U' (untagged) appears. o Click Apply. Remove a port from a VLAN Group o Click the box again until a blank box appears. This will remove VLAN membership from the port. o Click Apply. Page 88 of 121
-
 1
1 -
2
-
3
-
4
-
5
-
6
-
7
-
8
-
9
-
10
-
11
-
12
-
13
-
14
-
15
-
16
-
17
-
18
-
19
-
20
-
21
-
22
-
23
-
24
-
25
-
26
-
27
-
28
-
29
-
30
-
31
-
32
-
33
-
34
-
35
-
36
-
37
-
38
-
39
-
40
-
41
-
42
-
43
-
44
-
45
-
46
-
47
-
48
-
49
-
50
-
51
-
52
-
53
-
54
-
55
-
56
-
57
-
58
-
59
-
60
-
61
-
62
-
63
-
64
-
65
-
66
-
67
-
68
-
69
-
70
-
71
-
72
-
73
-
74
-
75
-
76
-
77
-
78
-
79
-
80
-
81
-
82
-
83
-
 84
84 -
 85
85 -
 86
86 -
 87
87 -
 88
88 -
 89
89 -
 90
90 -
 91
91 -
 92
92 -
 93
93 -
 94
94 -
95
-
96
-
97
-
98
-
99
-
100
-
101
-
102
-
103
-
104
-
105
-
106
-
107
-
108
-
109
-
110
-
111
-
112
-
113
-
114
-
115
-
116
-
117
-
118
-
119
-
120
-
121
-
122
-
123
 |
 |
