Netgear SRK60B03 User Manual - Page 105
ADVANCED > Advanced Setup > VLAN/Bridge Settings, Enable VLAN/Bridge Group
 |
View all Netgear SRK60B03 manuals
Add to My Manuals
Save this manual to your list of manuals |
Page 105 highlights
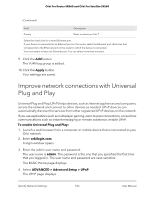
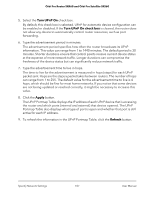
Orbi Pro Router SRR60 and Orbi Pro Satellite SRS60 packets that are sent between the IPTV device and the router's Internet port from being processed through the router's Network Address Translation (NAT) service. You can add VLAN tag groups to a bridge and assign VLAN IDs and priority values to each VLAN tag group. To add a VLAN tag group and enable the bridge: 1. Launch a web browser from a computer or mobile device that is connected to your Orbi network. 2. Enter orbilogin.com. A login window opens. 3. Enter the Orbi admin user name and password. The user name is admin. The password is the one that you specified the first time that you logged in. The user name and password are case-sensitive. The BASIC Home page displays. 4. Select ADVANCED > Advanced Setup > VLAN/Bridge Settings. The VLAN/Bridge Settings page displays. 5. Select the Enable VLAN/Bridge Group check box. The page expands. 6. Select the By VLAN tag group radio button. The section expands. 7. Click the Add button. The Add VLAN Rule page displays. 8. Specify the settings as described in the following table. Field Name VLAN ID Description Enter a name for the VLAN tag group. The name can be up to 10 characters. Enter a value from 1 to 4094. Specify Network Settings 105 User Manual
-
 1
1 -
2
-
3
-
4
-
5
-
6
-
7
-
8
-
9
-
10
-
11
-
12
-
13
-
14
-
15
-
16
-
17
-
18
-
19
-
20
-
21
-
22
-
23
-
24
-
25
-
26
-
27
-
28
-
29
-
30
-
31
-
32
-
33
-
34
-
35
-
36
-
37
-
38
-
39
-
40
-
41
-
42
-
43
-
44
-
45
-
46
-
47
-
48
-
49
-
50
-
51
-
52
-
53
-
54
-
55
-
56
-
57
-
58
-
59
-
60
-
61
-
62
-
63
-
64
-
65
-
66
-
67
-
68
-
69
-
70
-
71
-
72
-
73
-
74
-
75
-
76
-
77
-
78
-
79
-
80
-
81
-
82
-
83
-
84
-
85
-
86
-
87
-
88
-
89
-
90
-
91
-
92
-
93
-
94
-
95
-
96
-
97
-
98
-
99
-
 100
100 -
 101
101 -
 102
102 -
 103
103 -
 104
104 -
 105
105 -
 106
106 -
 107
107 -
 108
108 -
 109
109 -
 110
110 -
111
-
112
-
113
-
114
-
115
-
116
-
117
-
118
-
119
-
120
-
121
-
122
-
123
-
124
-
125
-
126
-
127
-
128
-
129
-
130
-
131
-
132
-
133
-
134
-
135
-
136
-
137
-
138
-
139
-
140
-
141
-
142
-
143
-
144
-
145
-
146
-
147
-
148
-
149
-
150
-
151
-
152
-
153
-
154
-
155
-
156
-
157
-
158
-
159
-
160
-
161
-
162
-
163
-
164
 |
 |
